In this article, we’re gonna explore the GitHub Extension for Visual Studio 2017 by answering the below questions:
- What’s the Git?
- What’s the GitHub?
- What’s the Repository?
- What’s the GitHub Extension for Visual Studio
- Install the GitHub Extension for Visual Studio
- Update the GitHub Extension for Visual Studio
- Set the GitHub as the default Source Control plugin
- Use the GitHub Extension for Visual Studio 2017
- Connect.
- Create.
- Clone.
- Main GitHub Extension functionalities
- Changes.
- Branch.
- Issue.
- Pull Request.
- Wiki.
- Fetch.
- Pull.
- Commit.
- Sync.
- Push.
- Add a new solution to GitHub
- Add an existing solution to GitHub
- Known Issue.
- Make a Private Repository
- Delete a GitHub Repository

What’s the Git?
Git is an open-source program for tracking changes in text files. It is the core technology for the GitHub.
What’s the GitHub?
GitHub is a web-based graphical interface Git or version control repository that mostly used for code.
It provides for each project access control and several collaboration features like bug tracking, feature requests, task management, and wikis.
Repository In GitHub
A repository is the most basic element of GitHub. it’s easiest to imagine as a project’s folder.
- A repository contains all of the project files (including documentation), and stores each file’s revision history.
- Repositories can have multiple collaborators and can be either public or private.
GitHub Extension for Visual Studio
GitHub Extension for Visual Studio is a valuable Visual Studio Extension that brings the GitHub Flow into Visual Studio.
Install the GitHub Extension for Visual Studio
The only available default connection is Visual Studio Team Services.
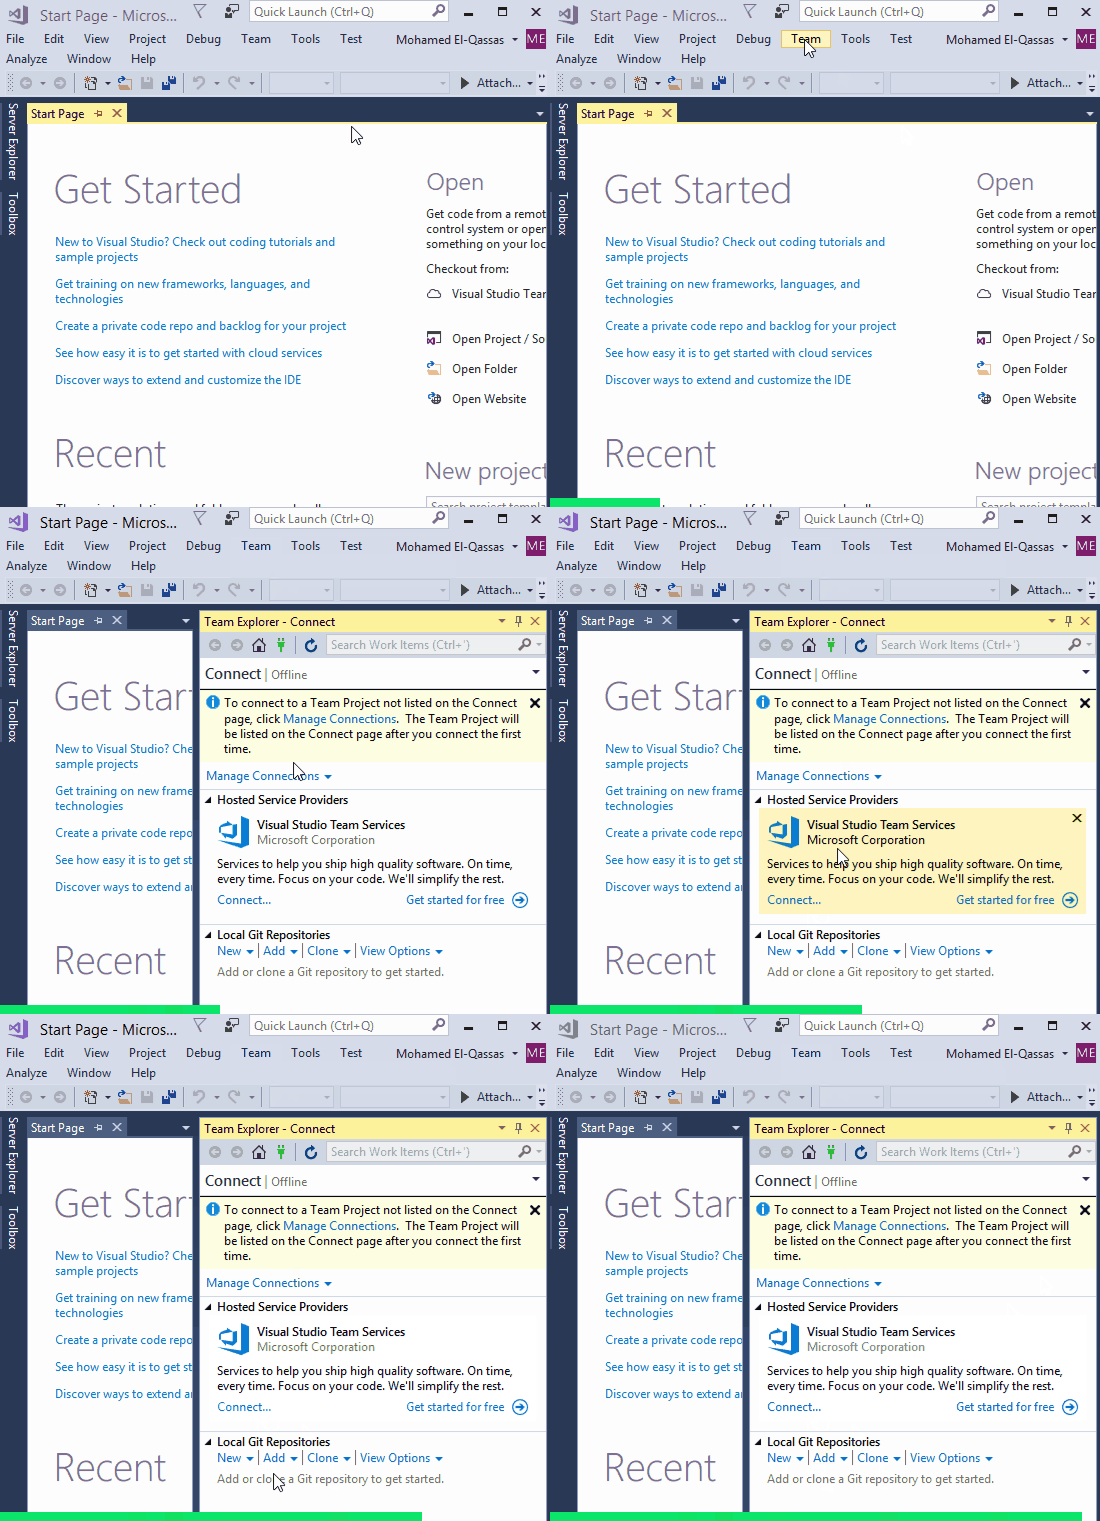
To install GitHub Extension for Visual Studio 2017, you should follow the steps below:
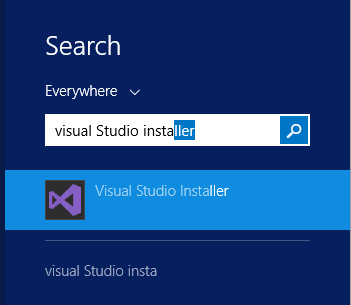
- Open Visual Studio Installer 2017.
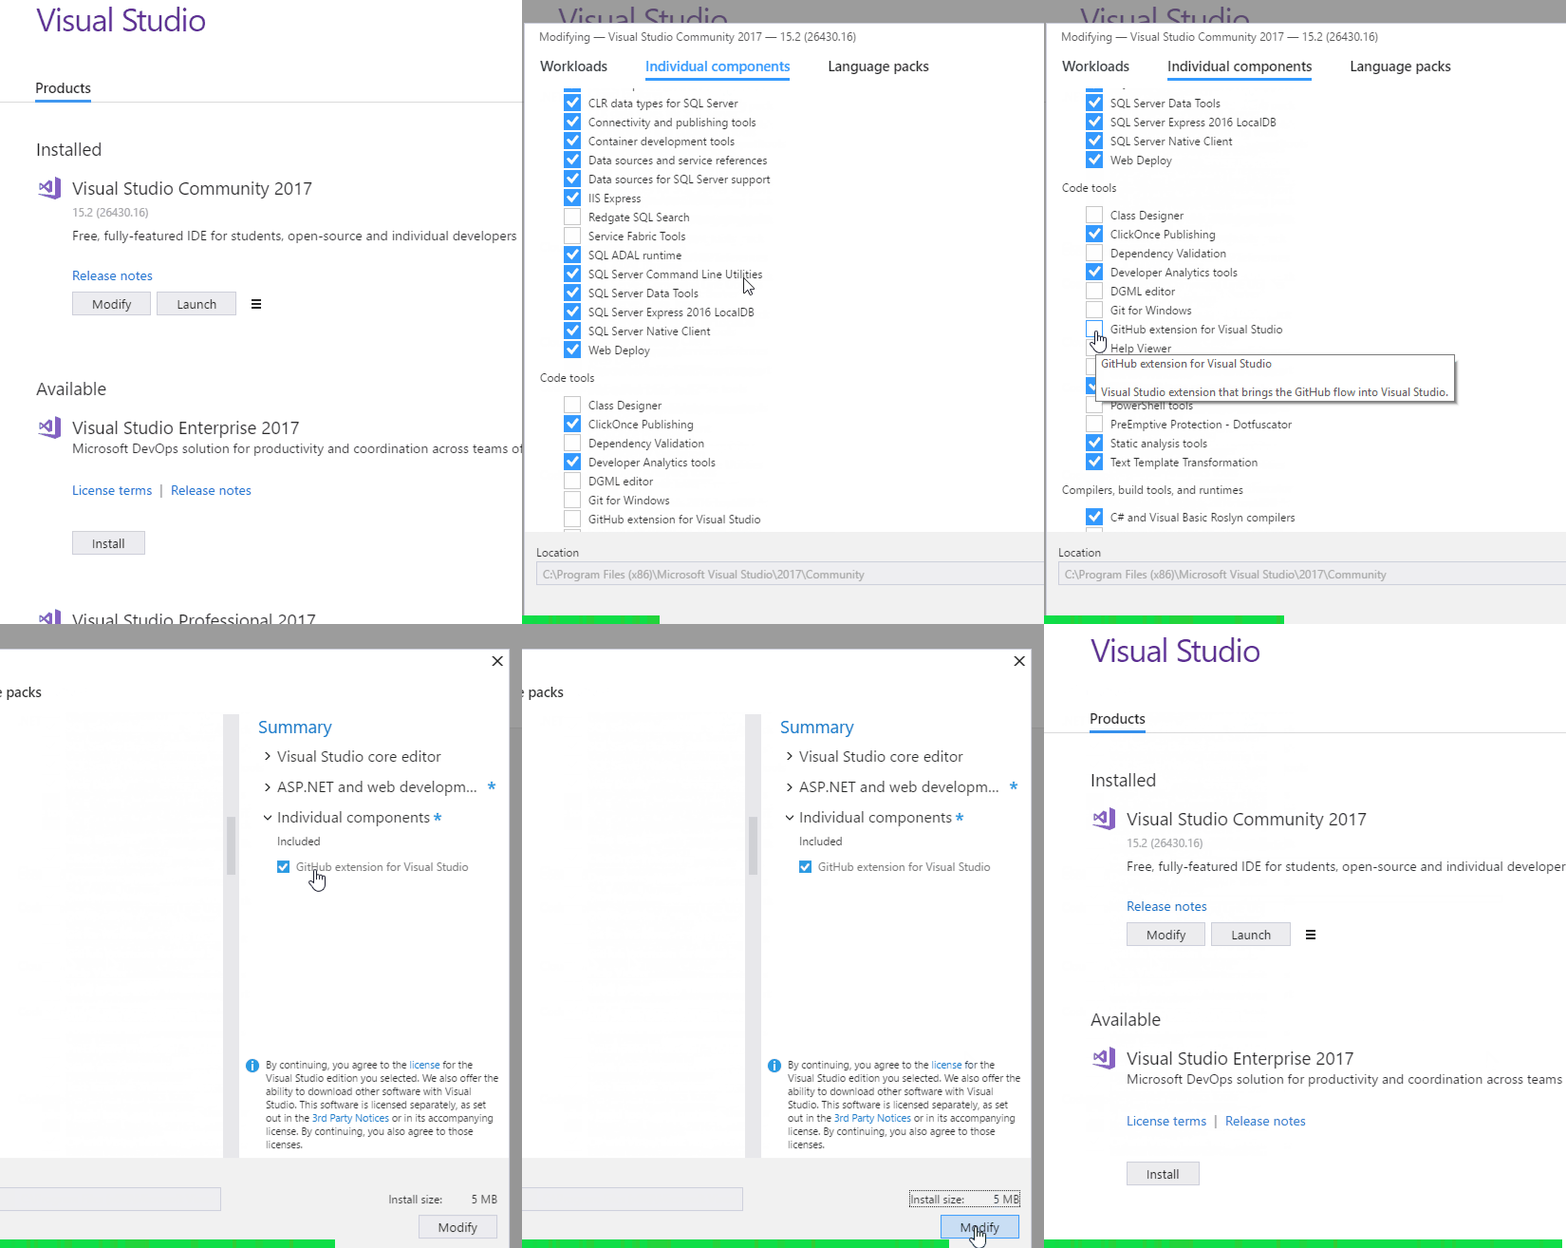
- Click on the Modify button.
- At individual Components > Below Code Tools > Check GitHub Extension for Visual Studio option. (Extension size is 5MB)
- Wait for the installation to complete successfully.
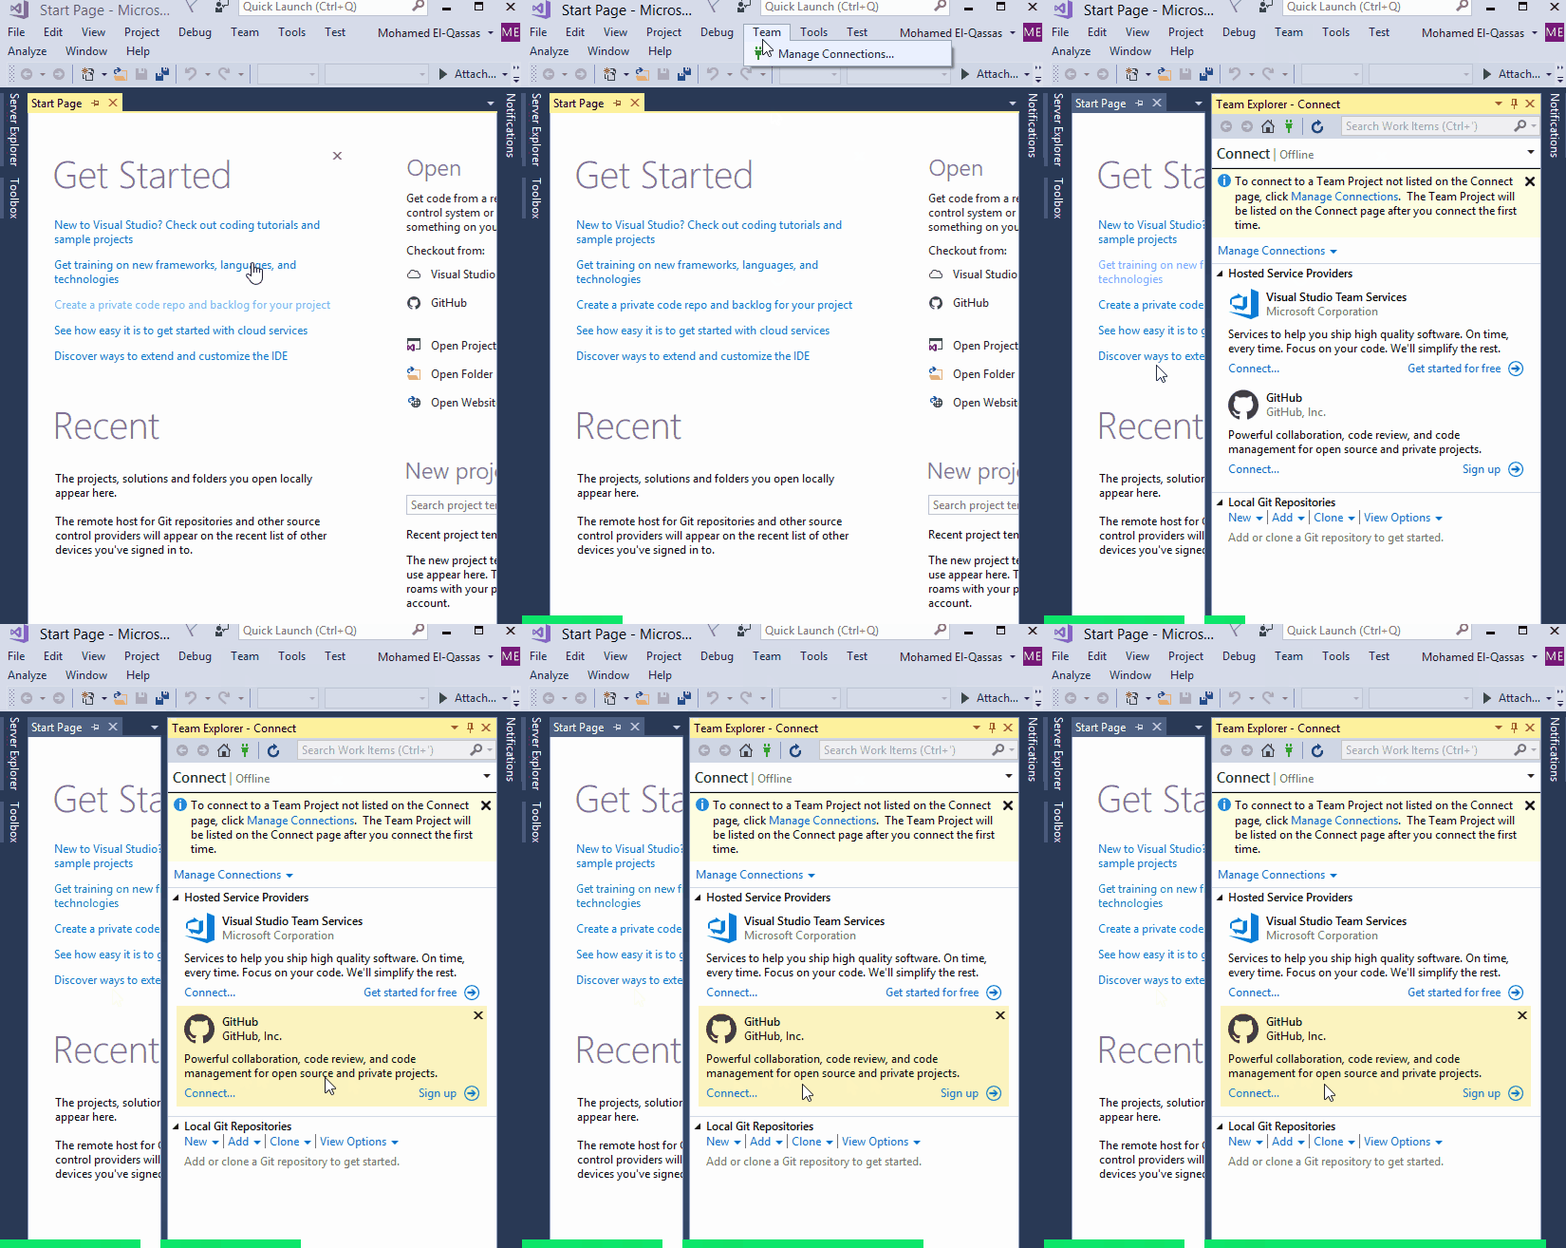
- Launch Visual Studio 2017.
- From Team Menu > Click on Manage Connections.
- After Installing GitHub Extension, you should find the GitHub section below Manage connections section as shown below.
Update the GitHub Extension for Visual Studio
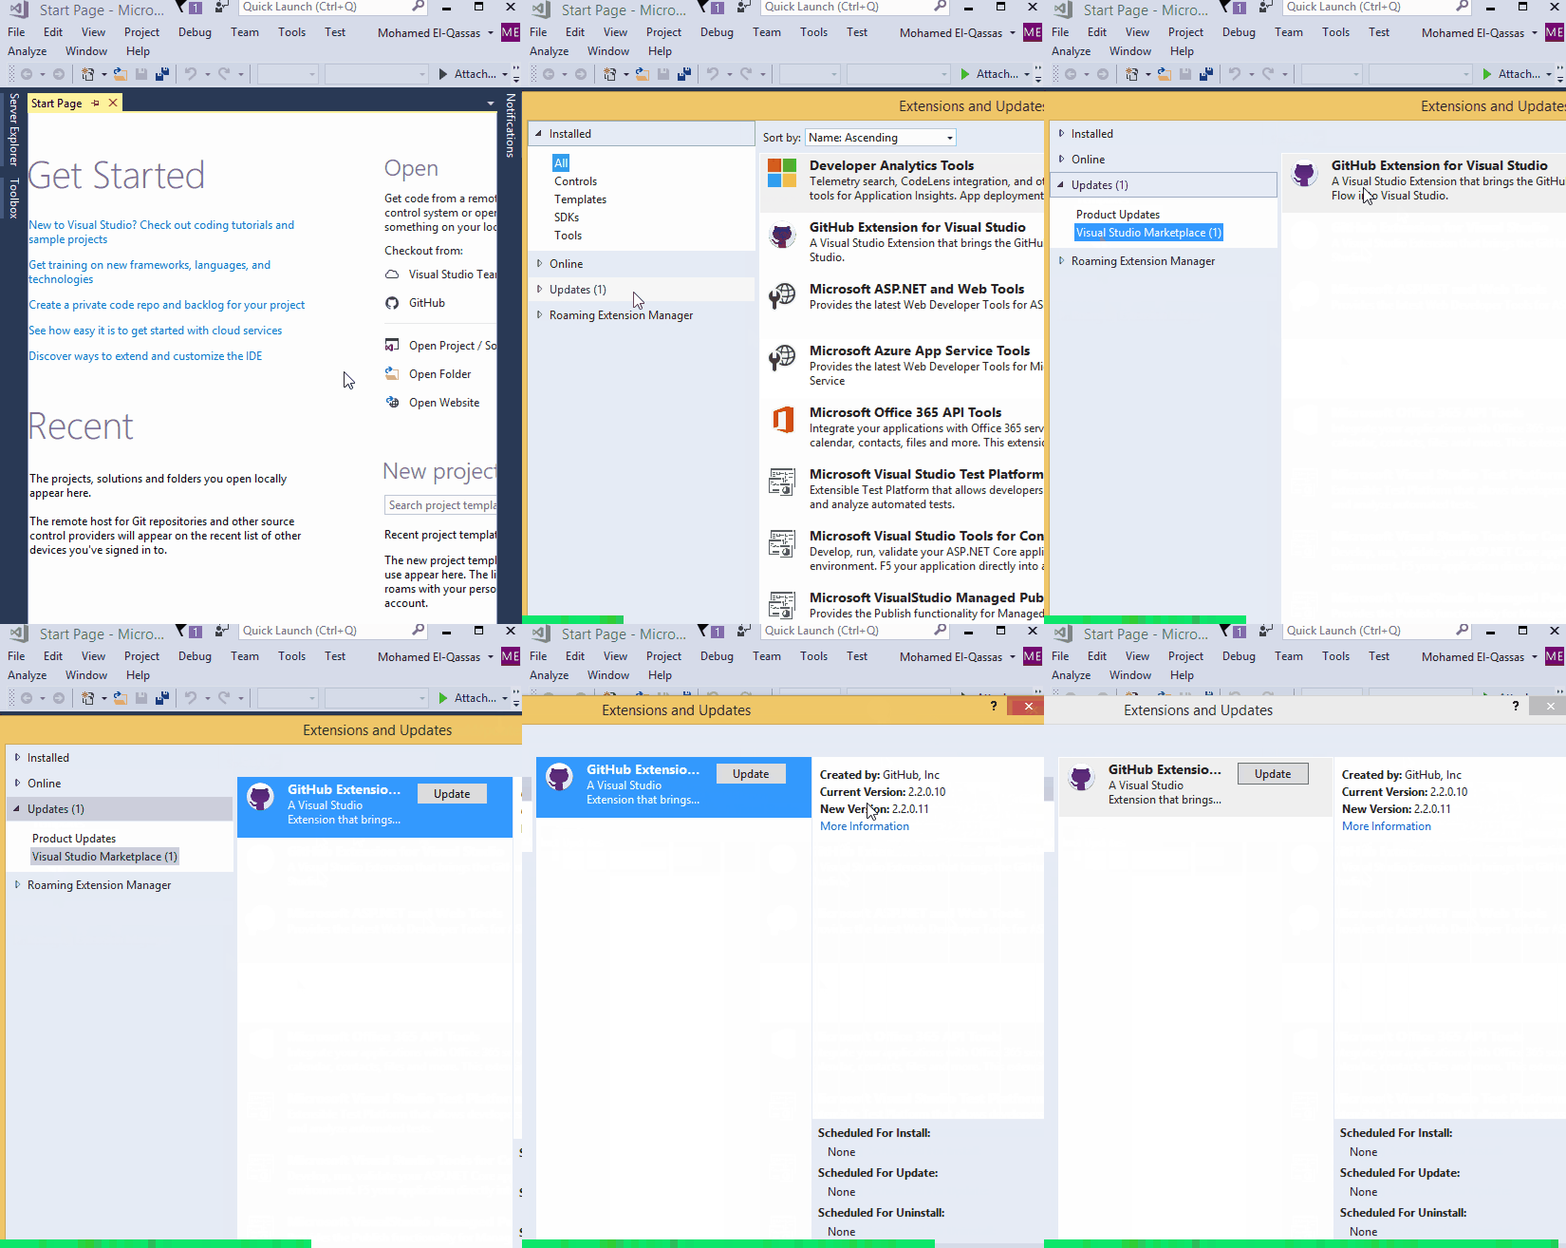
To update the GitHub Extension from 2.2.0.10 to latest update (2.2.0.11), you should do the following:
Enable Update Extensions
- Tools > Options > Below Environment section > Click on Extensions and Updates.
- In case, you have opened the Visual Studio as Administrator, you will be able to enable auto-check for updates for the current user and all users extensions.
- Check automatically check for update, and optionally enable auto-update for extensions.
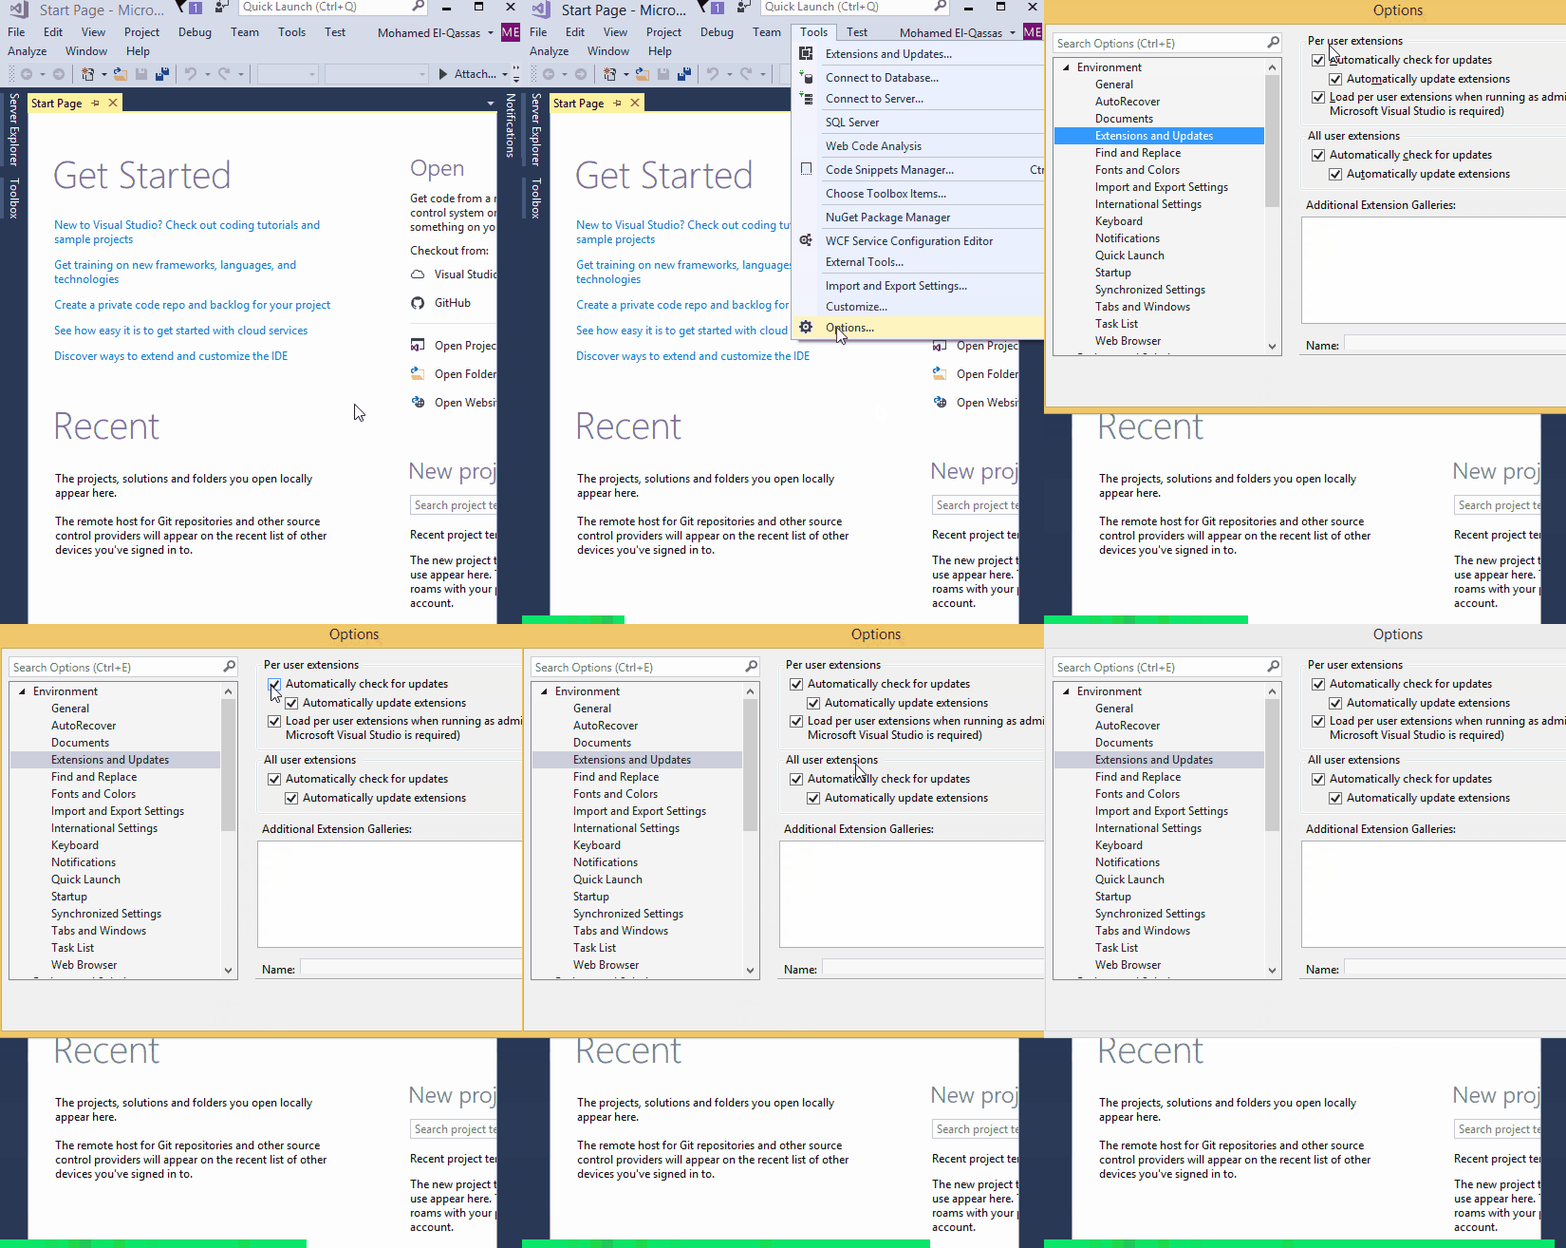
Check Extension & Updates in Tools Menu
- Go to Tools menu > Extensions & Update.
- At the Updates section, check the Visual Studio Market place, you should find a new update for GitHub Extension.
- Click on the Update button to update the current GitHub version.
Set the GitHub as the default Source Control Plug-in
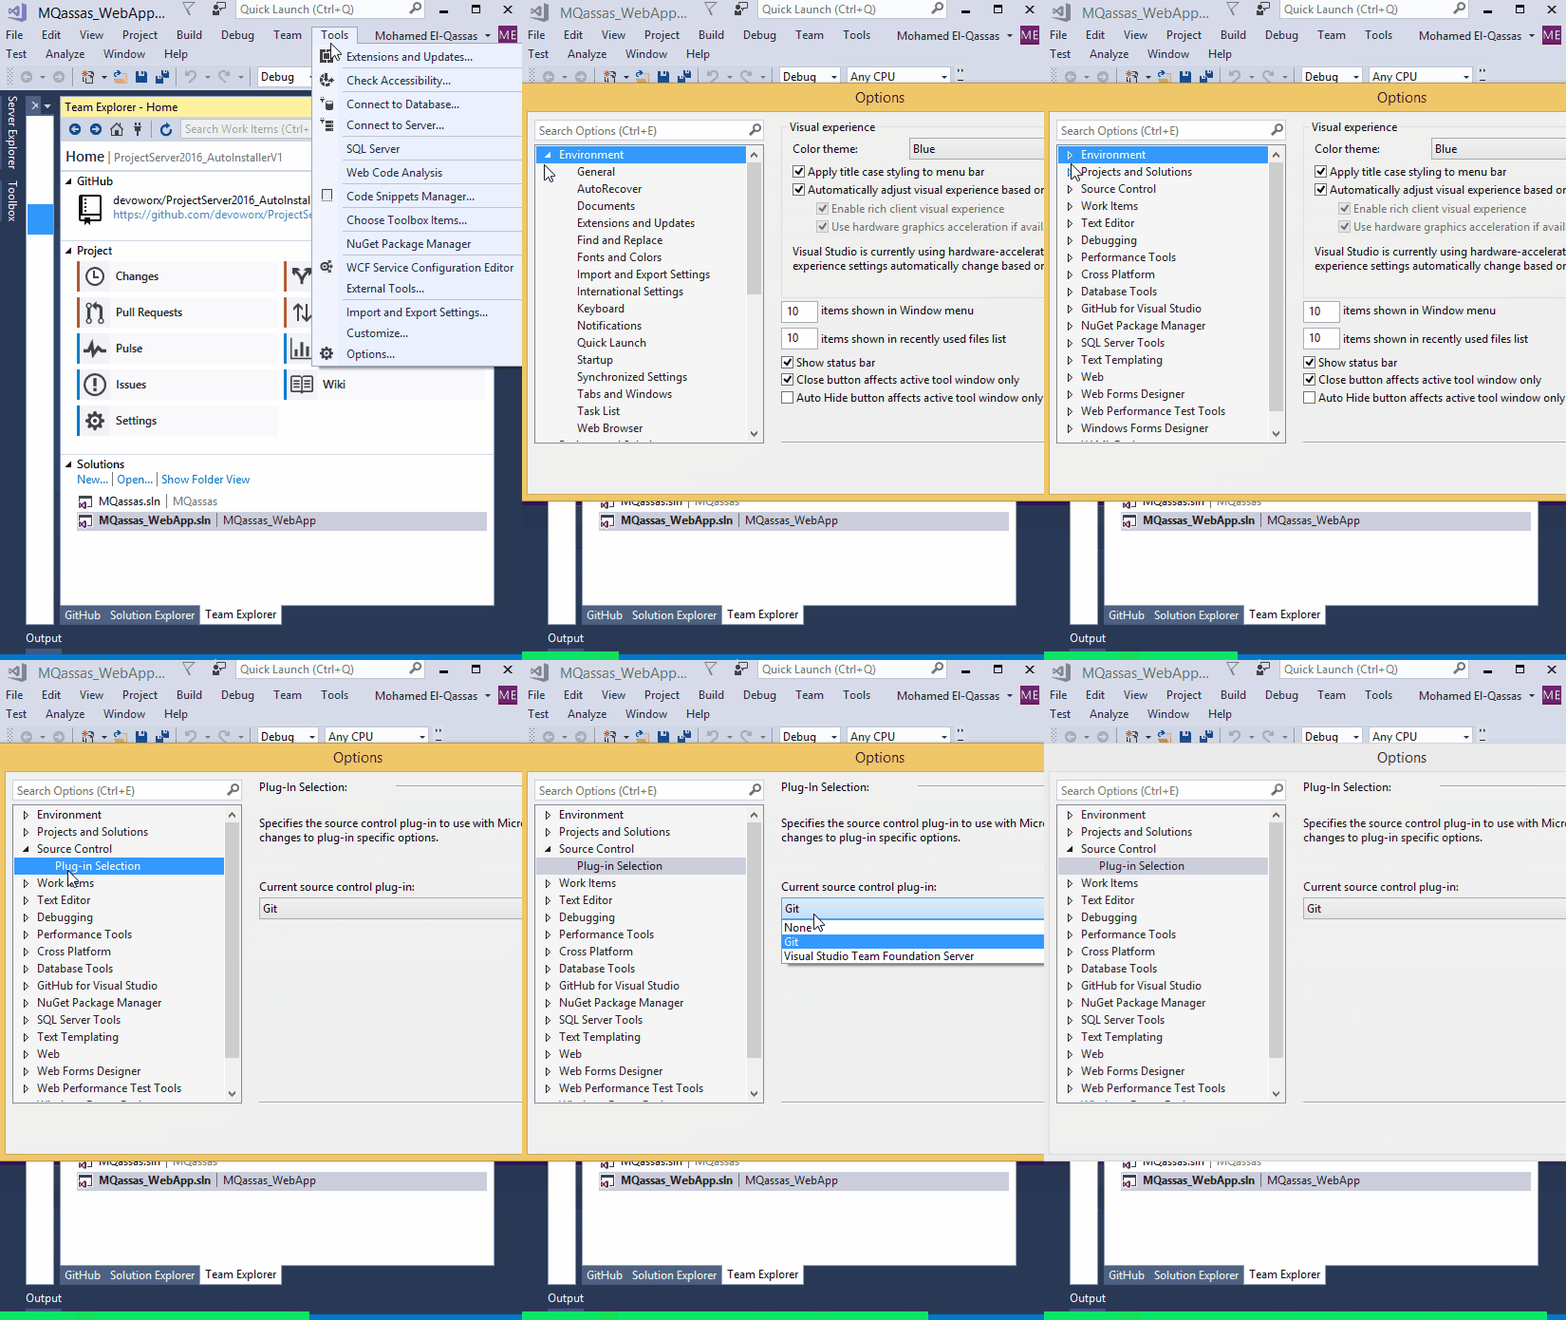
To set Git as a default source control plug-in for the new solution in Visual Studio 2017, you should do the following:
- Open Tool Menu > Options.
- At Source Control > Plug-in Selection > Make sure that the Git is selected.
Use the GitHub Extension for Visual Studio
Connect
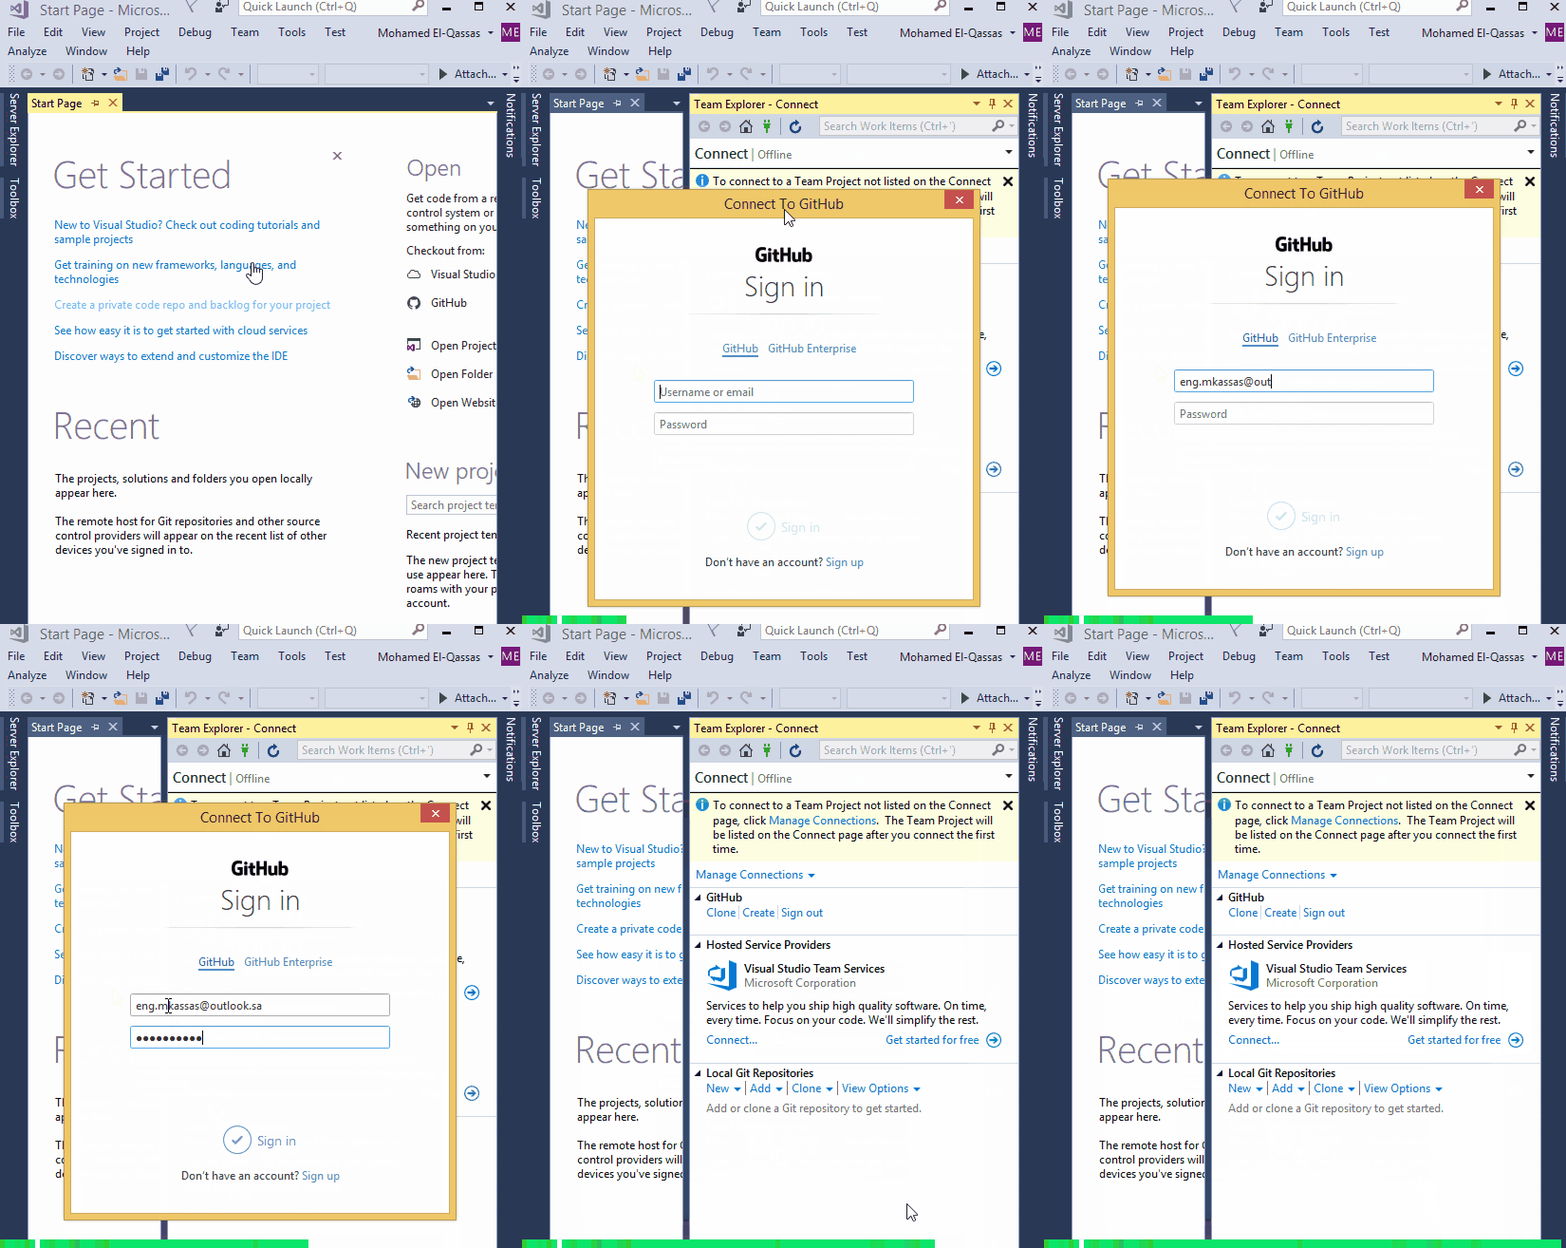
Once you have installed GitHub Extension for Visual Studio 2017, you should connect to your GitHub account by doing the following:
- From the Team menu, click on Manage Connections.
- Click on Connect to connect to your GitHub account. Or signup in case, you don’t have a GitHub account by clicking on SignUp.
- Provide your GitHub account credential > Sign In.
- Define the repository name, and optionally set its description.
- Select the repository path on your local computer.
- Specify the license as you prefer > then click Create.
Once you have connected to your GitHub account, you will have three options:
Create
To create a new repository, you should do the following:
- Click on the Create button, Define the repository name, and optionally set its description.
- Select the repository path on your local computer.
- Specify the license as you prefer > then click Create.
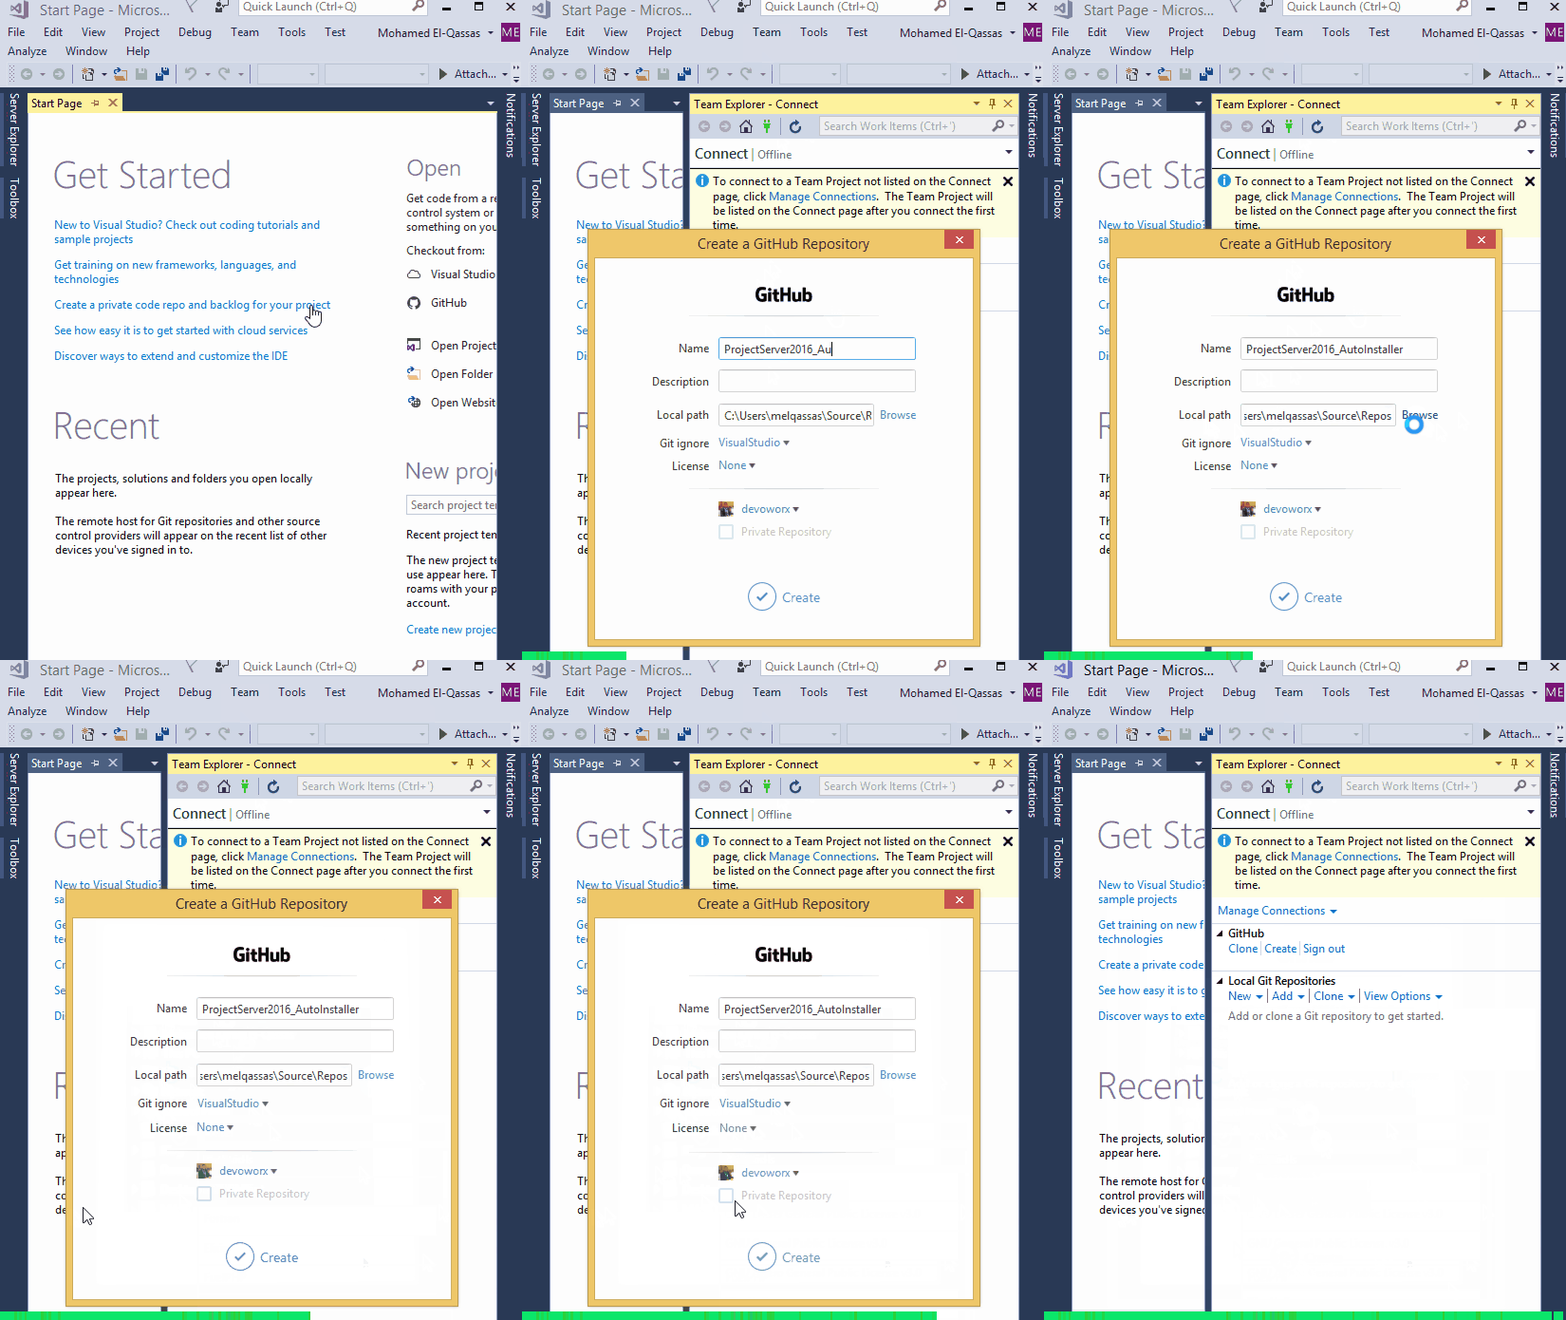
Clone
A clone is a copy of a repository that lives on your computer and connected to the remote version in GitHub.
So when you’re online you will be able to sync the changes between the two.
To Clone a Repository, you should do the following:
- Click on Clone button to list your repositories,
- Specify your local path as you prefer.
- Once the repository cloned, it will be listed in Local Git Repositories.

Sign Out
To log off your GitHub account from Visual Studio.
Main GitHub Extension functionalities
In this section, I will explain the main functionalities of the Github Extension.
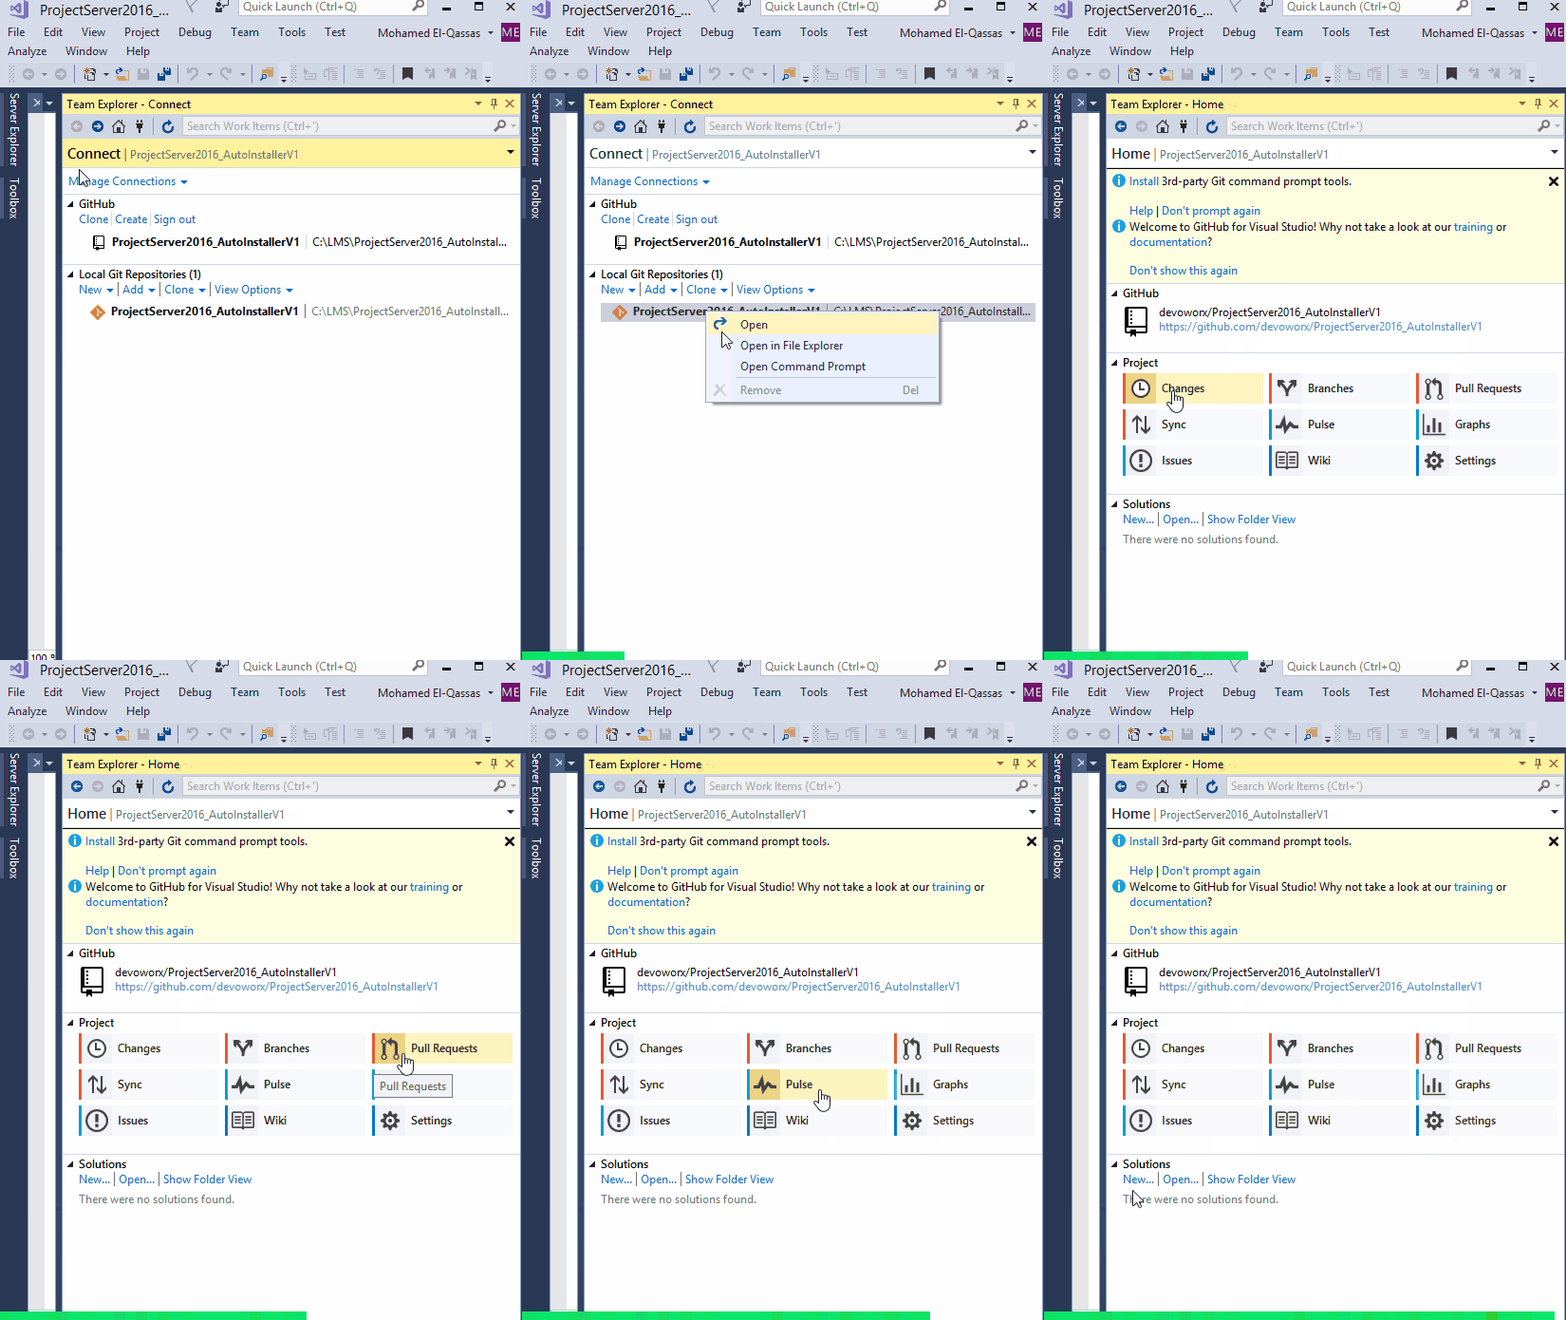
Changes
To track and publish the local repository changes.
Branch
A branch is a parallel version of a repository. It is contained within the repository but does not affect the primary or master branch allowing you to work freely without disrupting the “live” version. When you’ve made the changes you want to make, you can merge your branch back into the master branch to publish your changes.
Issue
Issues are suggested improvements, tasks or questions related to the repository. Issues can be created by anyone (for public repositories), and are moderated by repository collaborators. Each issue contains its own discussion forum, can be labeled and assigned to a user.
Pull Request
Pull requests are proposed changes to a repository submitted by a user and accepted or rejected by a repository’s collaborators.
Note: A collaborator is a person with reading and writes access to a repository who has been invited to contribute by the repository owner.
Pulse
Show Statistics of the merged and proposed Pull requests and the closed and new issue.
Graphs
Show Statistics of Contributors, Traffic, commits ….etc.
Wiki
Wikis provide a place in your repository to lay out the roadmap of your project, show the current status, and document software better, together.
Fetch
Fetching refers to getting the latest changes from an online repository without merging them in. Once these changes are fetched you can compare them to your local branches (the code residing on your local machine).
Pull
Pull refers to when you are fetching in changes and merging them. For instance, if someone has edited the remote file you’re both working on, you’ll want to pull in those changes to your local copy so that it’s up to date.
Commit
A commit, or “revision”, is an individual change to a file (or set of files). It’s like when you save a file, except with Git, every time you save it creates a unique ID that allows you to keep a record of what changes were made when and by who. Commits usually contain a commit message which is a brief description of what changes were made.
Sync
To share your changes with the Server.
Push
Pushing refers to sending your committed changes to a remote repository, such as a repository hosted on GitHub. For instance, if you change something locally, you’d want to then push those changes so that others may access them.
Add a new solution to GitHub from Visual Studio
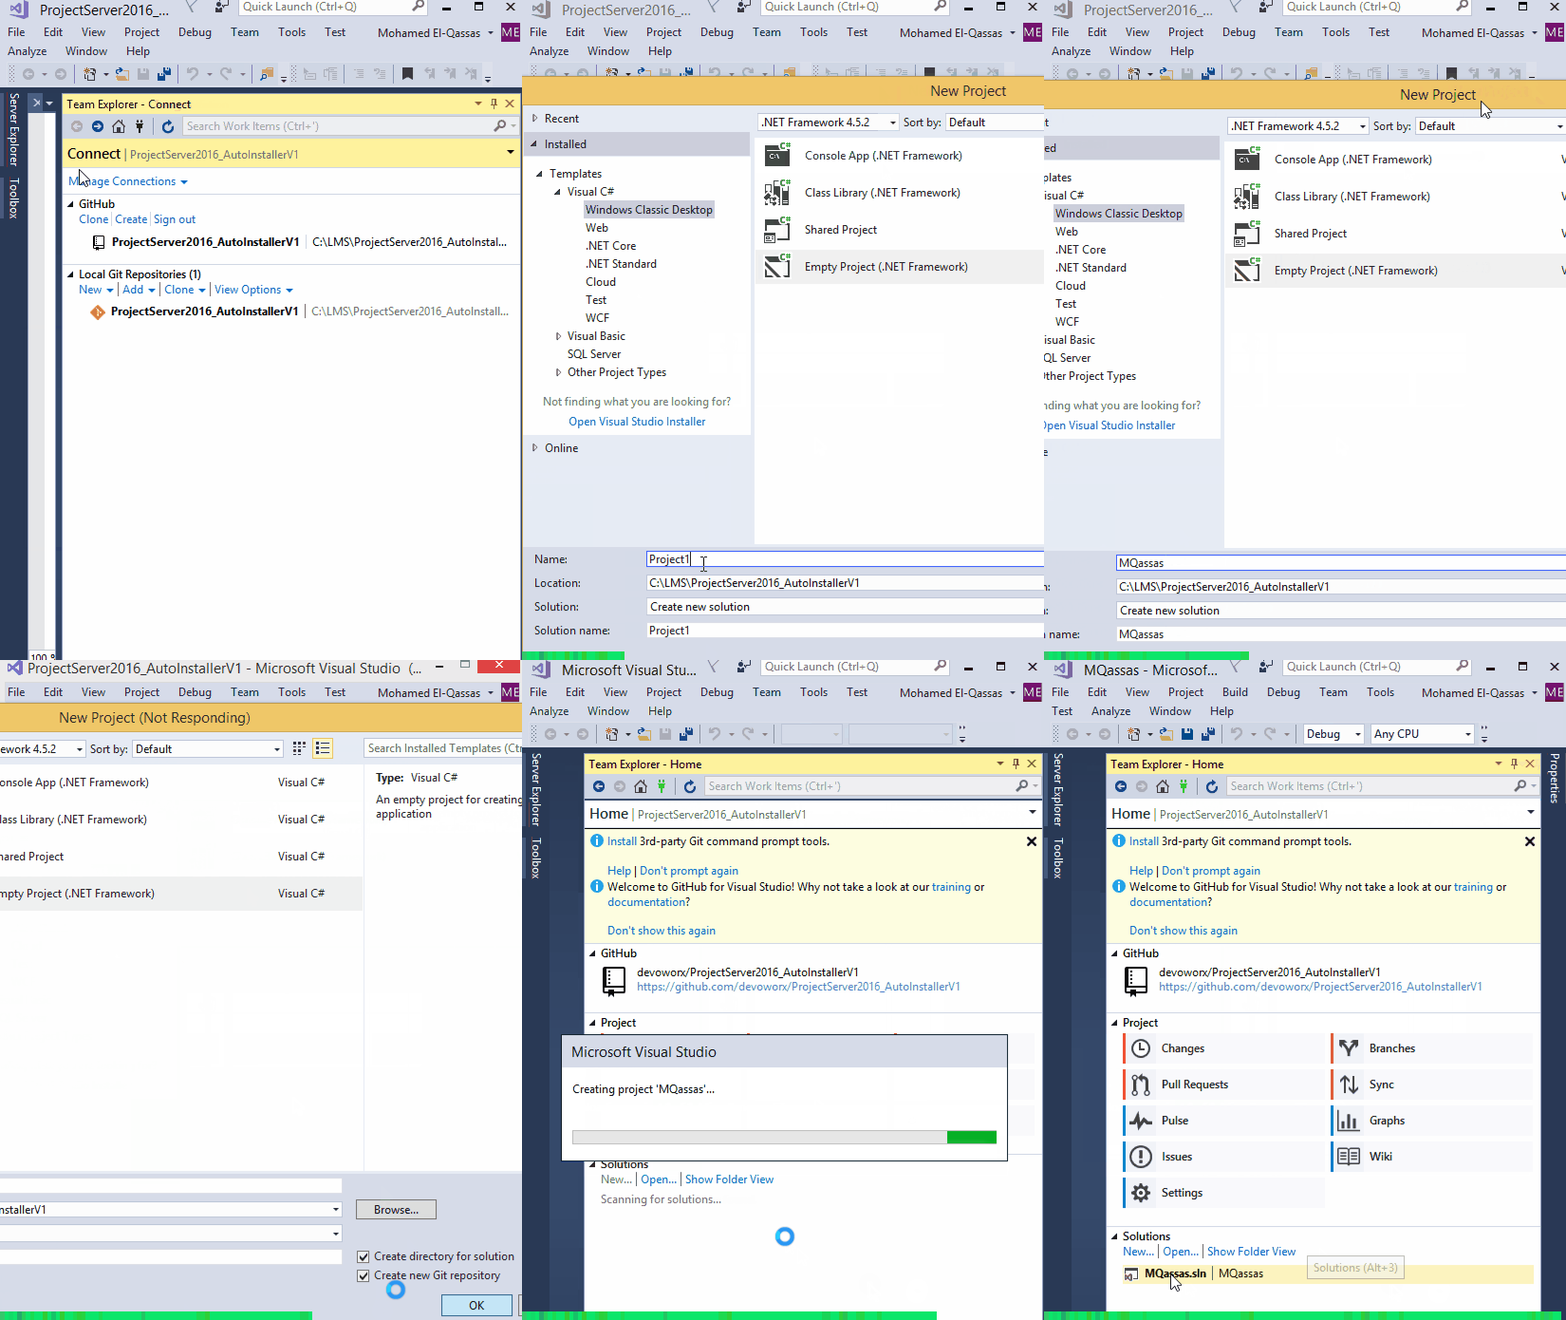
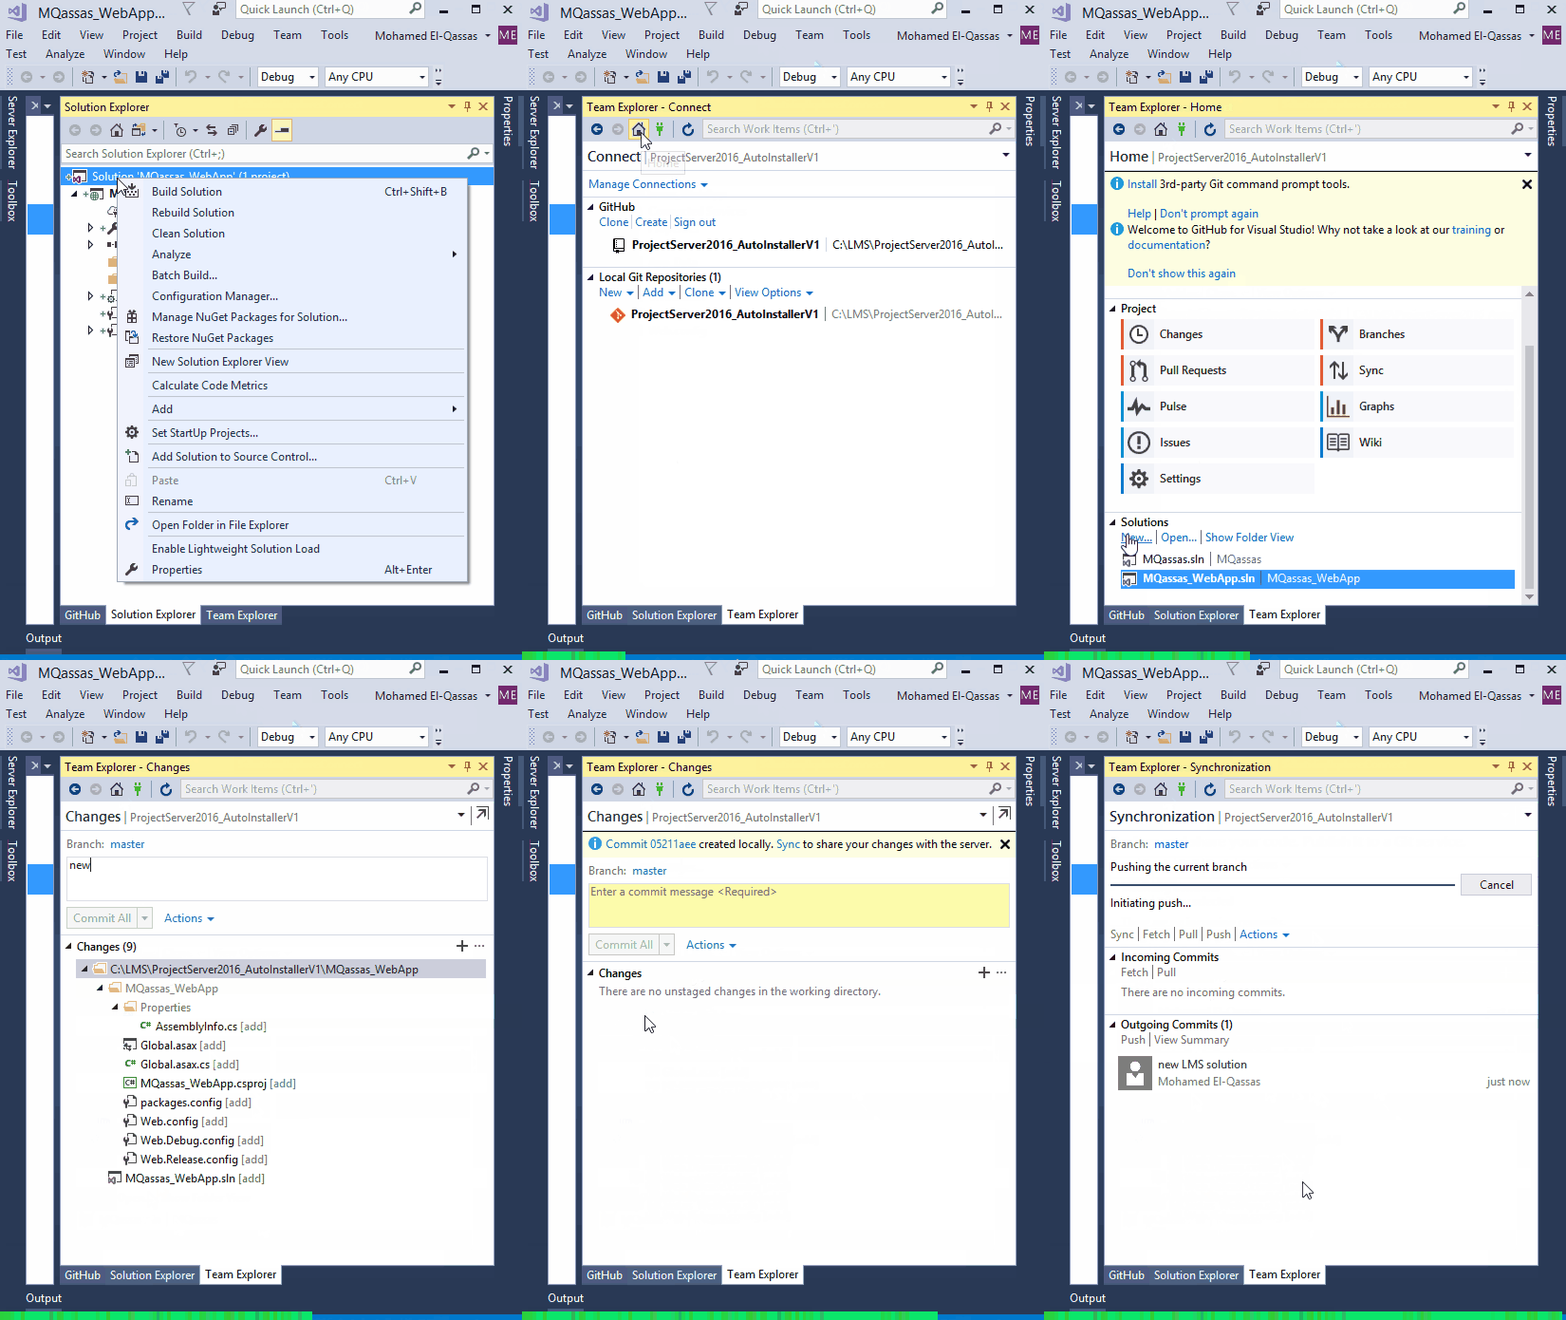
To add a new solution to a local Git Repository, you should do the following:
- Connect to the GitHub Extension.
- At the local Git Repositories section, Select your Repository > Righ Click > Open.
- At the Solutions Section, Click on New to add a new solution.
- Select your solution template > Provide the solution name and path > Create.
- Once the solution is created, it should be shown in the Solution section.
Push solution to Online GitHub from Visual Studio
- Click on Changes to list all new changes on Local Git Repository
- Provide a new comment that describes the new changes.
- Click on the CommitAll button.
- Click on Sync to share your changes to the server.
- In outgoing commit, Click on Push to push your new solution to the GitHub Online Repository.
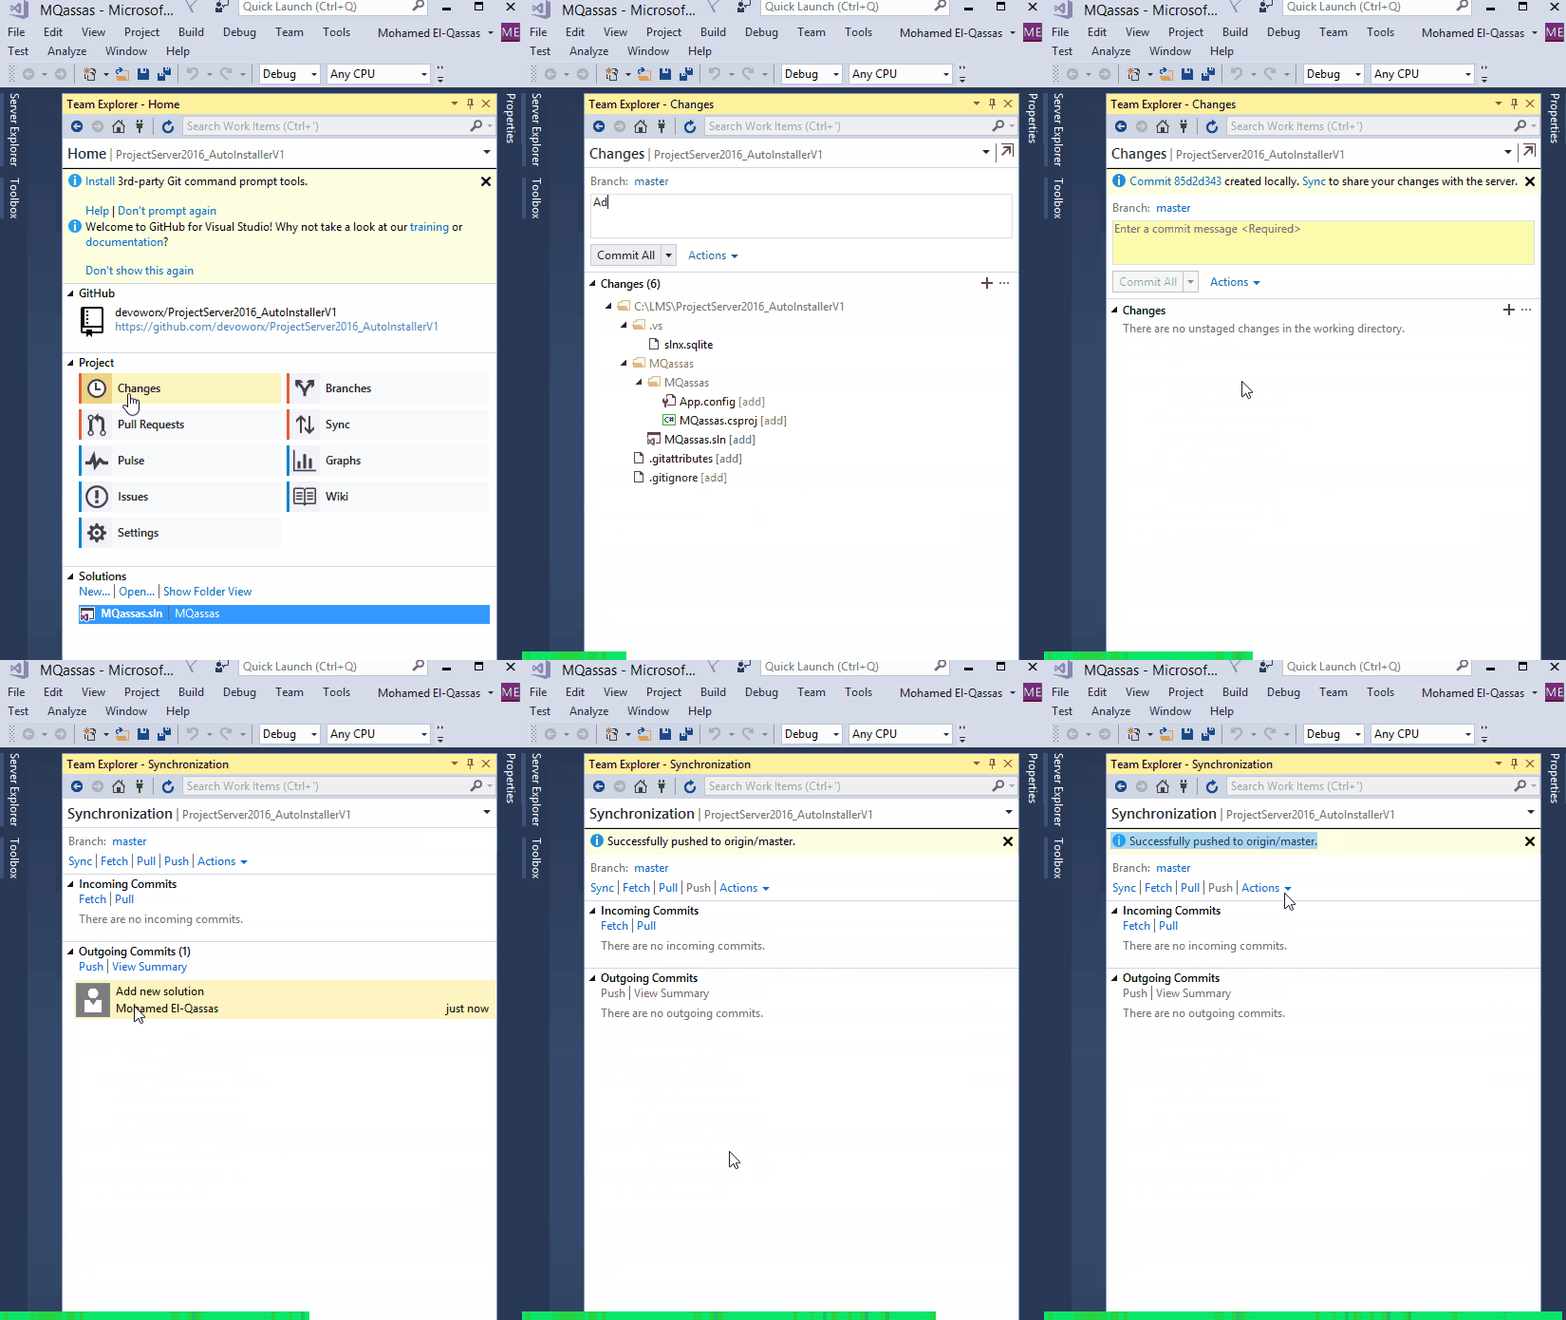
To make sure that the solution is published successfully, you should do the following:
- Open GitHub site > Sign in with your GitHub account.
- Click on your Repositories > Select your Branch.
- You should now find the solution has been synced and pushed to your online repository successfully.

Add an existing solution to GitHub
To add an existing solution to GitHub, you should do the following:
- Open your solution using Visual Studio.
- In Solution Explorer, Right clicks on the solution and select add to Source Control.
- The solution should be added to the default source control (Git).
- Go to your local Git Repository, Right-click and select Open.
- You should find the solution is listed in the Solution section.
- Click on changes to commit, sync and push your solution to GitHub Online Repository.
GitHub Known Issue
In some cases, when you are trying to perform a Clone or Puch, you may get the below error
Error encountered while cloning the remote repository: Git failed with a fatal error. fatal: unable to access ‘https://github.com/Youraccount/RepName.git/’: SSL certificate problem: self-signed certificate in the certificate chai
Solution:
- The new update of Visual Studio should solve this issue, as a temporary solution change the path of your Local Repository that will solve the issue. If you still face the issue check
Make a Private Repository on GitHub
This feature is not available in GitHub extension, it’s available in the GitHub Web site, at the same time it is not available in the free plan it requires additional fees.
Update: In 08/01/2019, GitHub announced two major updates to make GitHub more accessible to developers:
- unlimited free private repositories, and a simpler,
- unified Enterprise offering.
Make a Public Repository to Private Repository
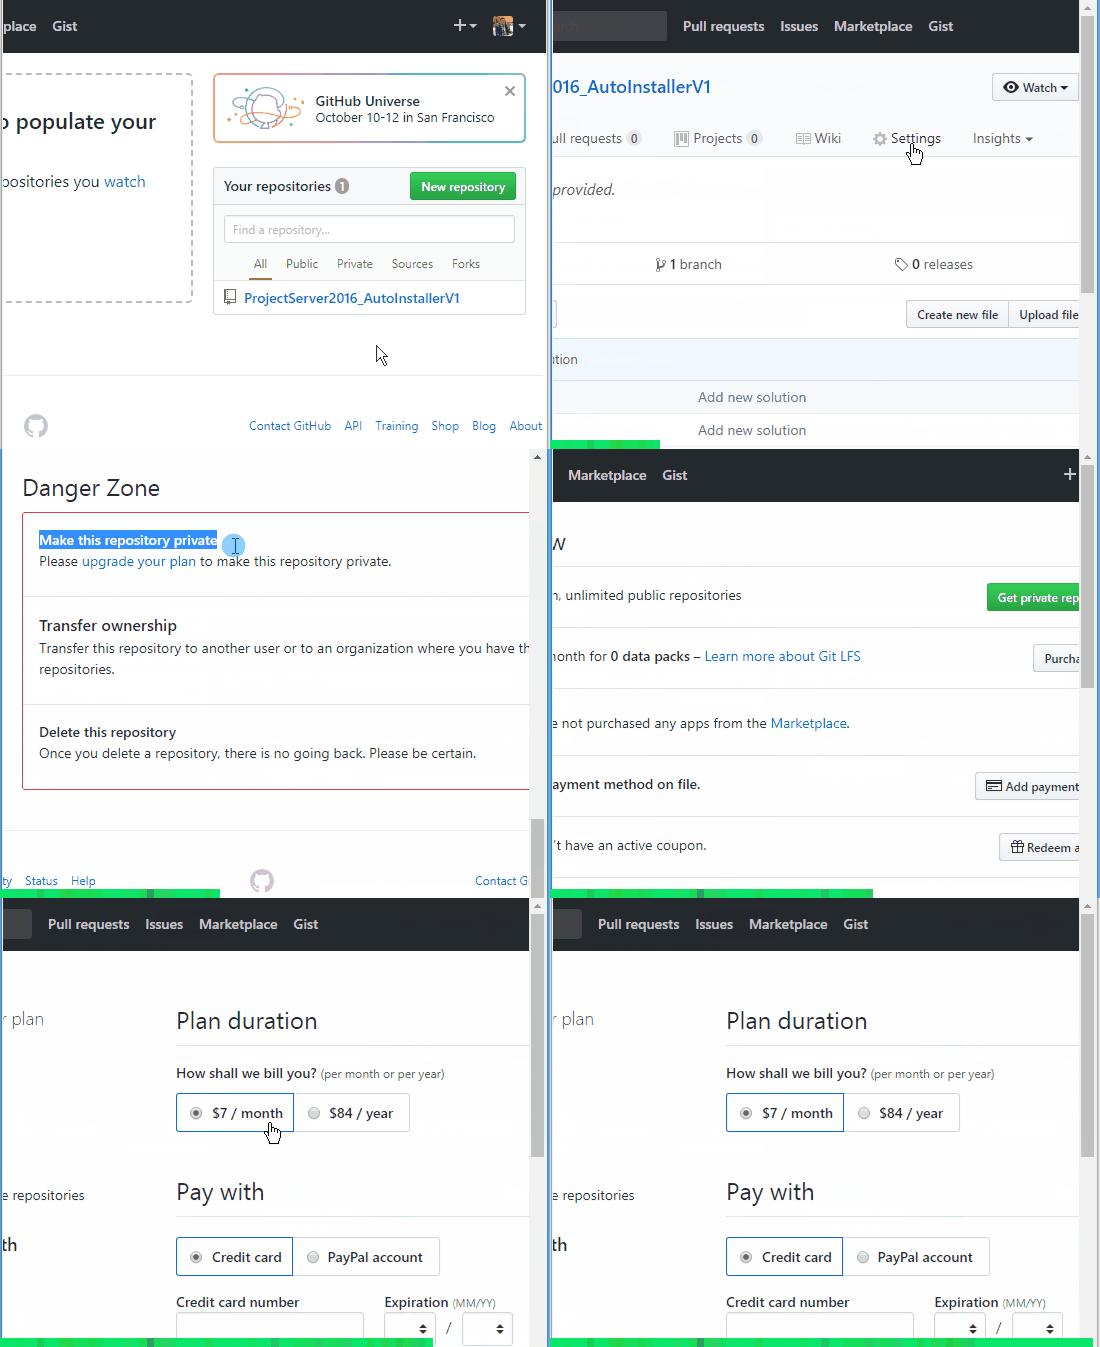
- Open GitHub site, Sign In.
- Open your repository, click on Settings.
- Scroll down to the Danger Zone, you should find Make this repository private.
- In case, you are using a free plan, you will be asked to upgrade your current free plan to the developer plan to make this repository private by paying 7$ monthly or 84$ yearly.
Delete a GitHub Repository
This feature is not available in GitHub extension, it’s available in the GitHub Web site.
Note: Once you delete a repository, there is no going back. Please be certain.
To delete your repository, you should do the following:
- Open GitHub site, Sign In.
- Open your repository, click on Settings.
- Scroll down to the Danger Zone, you should find Delete this repository.
- Provide the repository name as a type of confirmation, then click on I understand button.

Applies To
- GitHub.
- Visual Studio.
Conclusion
In conclusion, we have explored the GitHub Extension for Visual Studio 2017.
See Also
- Dive into Visual Studio 2017.
- Visual Studio 2017: New Installation Experience.
- Missing Office / SharePoint template in Visual Studio 2017.
- Add images in GitHub.
- Missing adding folder in GitHub.
Have a Question?
If you have any related questions, please don’t hesitate to Ask it at deBUG.to Community.


great article bro.
Thanks 🙂
Great article
Thank you 🙂