In this article, I will explain How to
Configure Alternate Access Mapping In SharePoint Server
Scenario
In SharePoint, I would like to use “http://epm“, to point to “the web application URL“.
This requirement can be achieved by Configuring Alternate Access Mapping.
In this article, I will go through the below sections:
- Configure alternate access mapping via Central Administration.
- Configure SharePoint Site Bindings.
- Configure Hosts file.
- Disable loop Back Check.
- Add “A” record on DNS server for your URL.
- Alternate Access Mapping considerations.
Steps:
Configure Alternate Access Mapping In SharePoint
- Open Central Administration as administrator > System Settings > Configure Alternate Access Mappings.

- The Alternate Access Mappings page should be shown.
- Click on Edit Public URL.
Note: by default, There must always be a public URL for the default zone, and you can’t delete the last internal URL for the default zone.
- Set the “Intranet Zone” to (http://URL.domain.local).
- In this case, It’s “http://epm.domain.local”.
- Set the “Internet Zone” to (http://URL).
- In this case, It’s “http://epm”

- Finally, the Alternate Access Mappings would be as the following:
- Click on image to view it in original size.
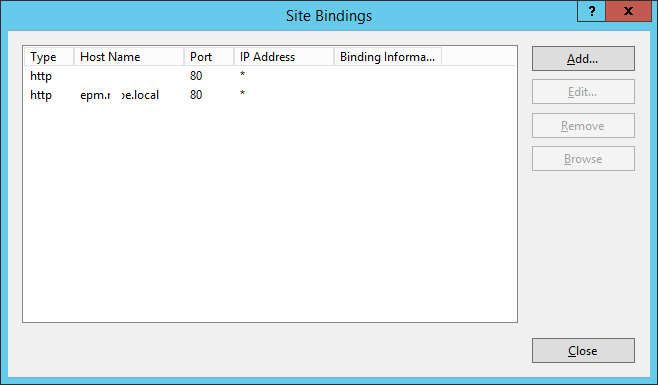
Configure SharePoint Site IIS Bindings
- Open IIS Manager > From left side, select SharePoint site > From right side, below Actions > Click on bindings.

- Click on add to add a new URL (http://URL.domain.local)

Configure Hosts file in SharePoint
- Navigate to the below path.
C:\Windows\System32\drivers\etc
![]()
- Open “hosts” file via an appropriate editor.
- Add the current server IP > click Tab from keyboard > add the URL.

Disable loop Back Check In SharePoint
- Run “Regedit“.

- Navigate to HKEY_LOCAL_MACHINE > System.

- System > CurrentControlSet > Control.

- Control > Lsa.

- Right-Click on “Lsa” to add a new key.

- Rename key with DisableLoopbackCheck > Right-click on it > select Edit.
- Change value data from 0 to 1 > click OK.

- Close Registry Editor and restart the server
Add “A” record on DNS server for your URL – Configure Alternate Access Mapping
- Ask the system administrator to create a new “A” record on the DNS server for http://epm.domain.local to Point to SharePoint server with IP: xxx.xxx.xxx.xxx or load balancer IP if you have high availability farm.
Note: To get SharePoint IP you should run this command “ipconfig /all”
You should be able now to connect to the SharePoint web application URL using http://epm inside your network.
Alternate Access Mapping considerations In SharePoint
- Alternate access mappings must be configured for load balancing, even though it generally does not apply to host header site collections. The default zone public URL should be set to a domain URL that is appropriate for all users to see. Unless you do this, the names of web servers or their IP addresses might be displayed in parameters that were passed between pages within SharePoint 2013.
- Host-named site collections can’t use alternate access mappings. Host-named site collections are automatically considered in the Default zone, and the URL of the request must not be changed between the user and the server.
- Alternate access mappings allow you to expose a web application in as many as five different zones, with a different IIS website backing each zone, some people mistakenly refer to this as having up to five different web applications sharing the same content databases. In reality, there is just one web application.
- There must always be a public URL for the default zone.
- You can’t delete the last internal URL for the default zone.
Applies To
- SharePoint 2016.
- SharePoint 2013.
- SharePoint 2010.
Conclusion
In this article, I have explained How to
- Configure alternate access mapping via Central Administration.
- Configure SharePoint Site Bindings.
- Configure Hosts file.
- Disable loop Back Check.
- Add “A” record on DNS server for your URL.
- Alternate Access Mapping considerations.


Awesome, thank you
Welcome 🙂
to be honest your blogs really nice,thanks for sharing