In this article, we will explain How to create custom web part properties with default value in Visual WebPart in SharePoint 2013 and SharePoint 2016? Additionally, we will explain How to create Multiple Custom Properties in the Visual Web Part and how to read the custom properties in your code.
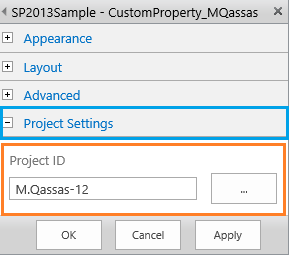
In SharePoint 2013/2016, I need to create custom web part properties and set default value as a custom property as shown below:
Steps
- Open Visual Studio as Administrator.
- Create a new Empty SharePoint Solution.
- Add new item > Visual Web Part.
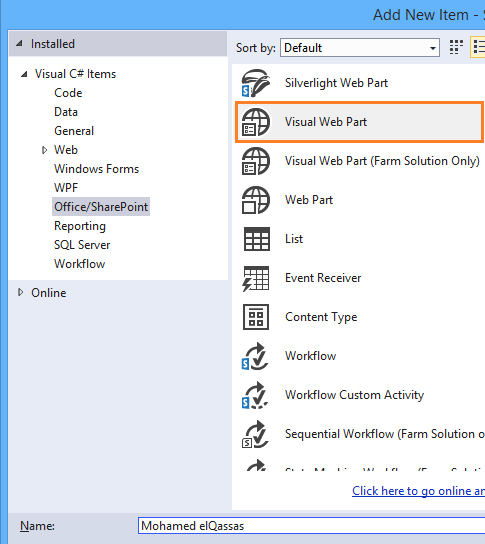
Note: Make sure that you have selected Visual Web Part not Visual Web Part (Farm Solution Only).
The custom property has a different configuration with Visual Web Part (Farm Solution Only) that will be dicussed later in this post
- From Solution Explorer > Double click on .asx.cs file.
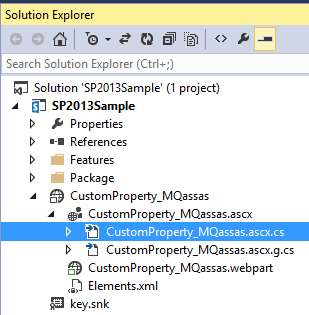
- By default, the following code would be generated above class definition.
[ToolboxItemAttribute(false)]Create a Custom Property in Visual WebPart
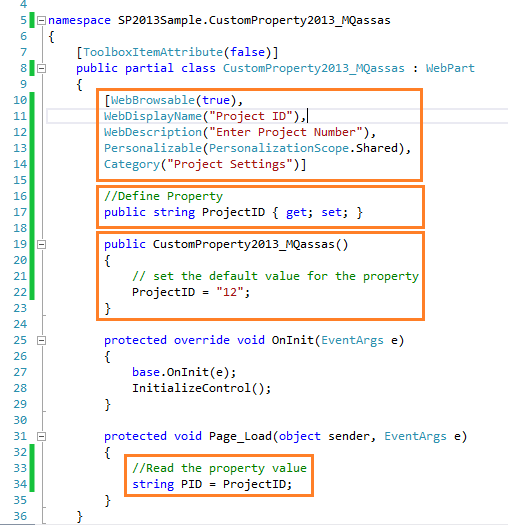
To create a custom property in SharePoint Visual WebPart, you have to add the below code in the cs file directly under the class definition
[WebBrowsable(true),
  WebDisplayName("Project ID"),
  WebDescription("Enter Project Number"),
  Personalizable(PersonalizationScope.Shared),
  System.ComponentModel.Category("Project Settings")
]

public string ProjectID {
  get;
  set;
}
Visual Web Part Custom Properties Attributes
- WebBrowsable attribute enables the property to be displayed in edit mode of Web Part. If set to false, this property won’t be available for the users to change the property by editing the Web Part.
- WebDisplayName attribute is the user-friendly display name for this property.
- WebDescription attribute acts as a tooltip for WebDisplayName attribute.
- Personalizable attribute accepts PersonalizationScope enumerator as an input. This enumerator has two options one is Shared, and another one is User. If this attribute is set as Shared, the changes to this property will be available to all users. If this attribute is set to User, then changed property value will be available only for that user alone.
- Category attribute is used to display this property under a specified group.
Set the default value for a custom Property in Visual WebPart
In the Visual Web Part Constructor, you can set the default value for Custome Property if needed as below
public CustomProperty2013_MQassas() {
  // set the default value for the custom property in Vsiual Web Part
  ProjectID = "M.Qassas-12";
}
Read the Custom Property in Visual WebPart
To read the custom property value in VisualWebPart, you just need to set the property variable name as below
if (!Page.IsPostBack) {
  //Read the property value
  string PID = ProjectID;
}
Final Code: Custom Visual Web Part Properties
The final code should look like the below sample, and based on your need you can change the Property Name, and its attributes
using System;
using System.ComponentModel;
using System.Web.UI.WebControls.WebParts;

namespace SP2013Sample.CustomProperty2013_MQassas {
  [ToolboxItemAttribute(false)]
  public partial class CustomProperty2013_MQassas: WebPart {
    [WebBrowsable(true),
      WebDisplayName("Project ID"),
      WebDescription("Enter Project Number"),
      Personalizable(PersonalizationScope.Shared),
      Category("Project Settings")
    ]

    //Define Property
    public string ProjectID {
      get;
      set;
    }

    public CustomProperty2013_MQassas() {
      // set the default value for the property
      ProjectID = "M.Qassas-12";
    }

    protected override void OnInit(EventArgs e) {
      base.OnInit(e);
      InitializeControl();
    }

    protected void Page_Load(object sender, EventArgs e) {
      if (!Page.IsPostBack) {
        //Read the property value
        string PID = ProjectID;
      }
    }
  }
}
Deploy Visual WebPart with Custom Property
Finally, you have to build and deploy your SharePoint Solution to find the result by doing the following:
- After deploying the SharePoint solution.
- Go to your page to add Web Part > From right side click on arrow > Select Edit Web Part.
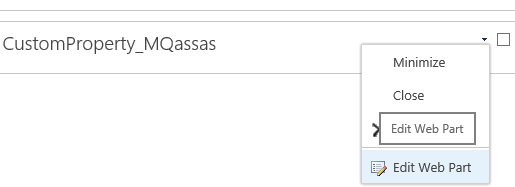
- The new “Project ID” property should be now added successfully under the “Settings” category as shown below

How to create Multiple Custom Properties in Visual WebPart?
In the previous example, we have explained, how to create a custom property in Visual WebPart and How to set and get its value. but in some cases, you maybe need to add more than Custom property in Visual WebPart! so in this case, you have to understand the following:
First, the custom web part property block consists of two sections as below
[WebBrowsable(true),
  WebDisplayName("Project ID"),
  WebDescription("Enter Project Number"),
  Personalizable(PersonalizationScope.Shared),
  System.ComponentModel.Category("Project Settings")
]

public string ProjectID {
  get;
  set;
}
So If you need to create Multiple custom properties in Visual WebPart, you have to define each property as the following:
// First Property

[WebBrowsable(true),
  WebDisplayName("SMTP Server"),
  WebDescription("Enter SMTP Server"),
  Personalizable(PersonalizationScope.Shared),
  System.ComponentModel.Category("Mail Settings")
]

public string SMTPServer{
  get;
  set;
}


// Second Property

[WebBrowsable(true),
  WebDisplayName("SMTP Port"),
  WebDescription("Enter SMTP Port"),
  Personalizable(PersonalizationScope.Shared),
  System.ComponentModel.Category("Mail Settings")
]

public int SMTPPort{
  get;
  set;
}
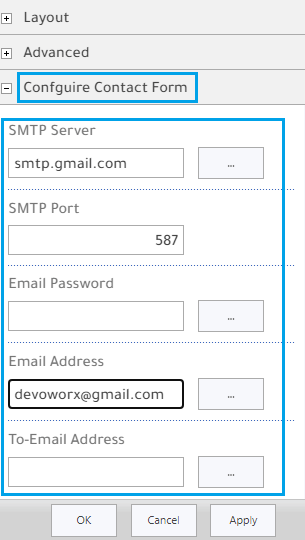
The Multiple Custom Properties in Visual WebPart should look like the below image
How to create custom properties in Visual WebPart (Farm Solution Only)?
In the Visual Web Part (Farm Solution Only), you can’t use the Custom Property as we earlier mentioned, this is becasue the partial class inherits from UserControl

Not from System.Web.UI.WebControls.WebParts.WebPart.

But what if you need to use custom WebPart property with Visual WebPart Farm Solution Only, Is it Possible?
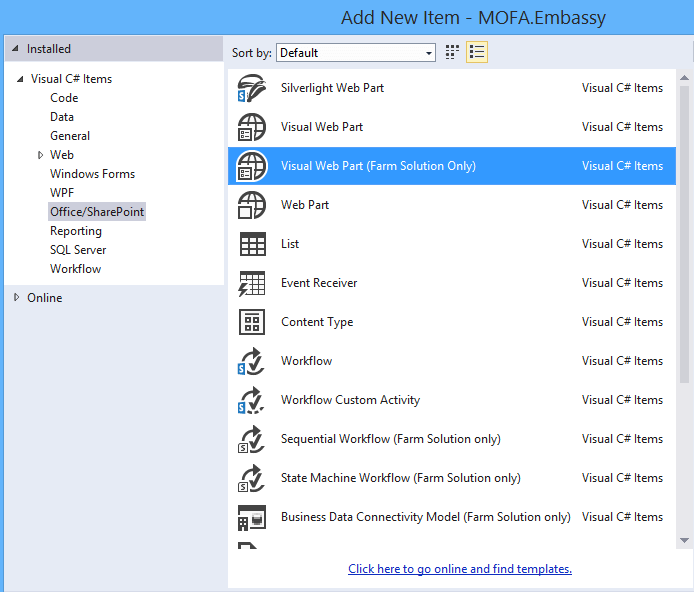
Fortunately, you can also create custom WebPart property with Visual WebPart Farm Solution Only. however, it will require additional configuration to do that. and in the next section, we will discuss how to create a custom Property in Visual WebPart (Farm Solution Only) in more detail.
Create custom properties in Visual WebPart (Farm Solution Only)
Once you create a Visual WebPart (Farm Solution Only), you will note that there are three main files as below
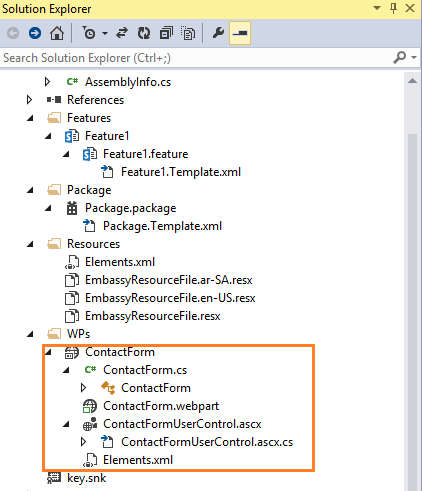
If you opened the “ascx.cs” file, you will note that the partial class is inherited from UserControl, not WebPart.

In this case, we can’t add the property definition in this file, and instead, we should add it in the “cs” file like the following:
- Open the “ContactForm.cs” file, and below the class definition add your Property defination.
namespace Debug_WebParts.WPs.ContactForm {
  [ToolboxItemAttribute(false)]
  public class ContactForm: WebPart {

    [WebBrowsable(true),
      WebDisplayName("SMTP Server"),
      WebDescription("Enter SMTP Server"),
      Personalizable(PersonalizationScope.Shared),
      System.ComponentModel.Category("Email Settings")
    ]

    public string SMTPServer{
      get;
      set;
    }

    .
    .
    .

  }
}- Go back to open the “ContactFormUserControl.ascx.cs”.
- Below the class definition, create a new instance from the “ContactForm.cs” class.
public ContactForm contactform { get; set; } - Again, go back to “ContactForm.cs” file, and at “CreateChildControls()” function, add the below code
 protected override void CreateChildControls() {
   ContactFormUserControl control = Page.LoadControl(_ascxPath) as ContactFormUserControl;
  // ContactFormUserControl is the webpart usercontrol name based on your webpart
   control.contactform = this;
  // contactform is the newly created variable name in the "ContactFormUserControl.ascx.cs"
   Controls.Add(control);
}- To get the property value in the “ContactFormUserControl.ascx.cs”, you have to do the following:
String SMTPServer = contactform.SMTPServer;The final code in the “ContactFormUserControl.ascx.cs” file
using System;
using System.ComponentModel;
using System.Web.UI;
using System.Web.UI.WebControls;
using System.Web.UI.WebControls.WebParts;

namespace devoworx_WebParts.WPs.ContactForm {

  public partial class ContactFormUserControl: UserControl {

    public ContactForm contactform {
      get;
      set;
    }

    protected void Page_Load(object sender, EventArgs e) {
      if (!Page.IsPostBack) {
        lbl_debug.Text = contactform.SMTPServer;
      }
    }

  }
}.The final code in the “ContactForm.cs” file
using System;
using System.ComponentModel;
using System.Web;
using System.Web.UI;
using System.Web.UI.WebControls;
using System.Web.UI.WebControls.WebParts;
using Microsoft.SharePoint;
using Microsoft.SharePoint.WebControls;

namespace devoworx_WebParts.WPs.ContactForm {
  [ToolboxItemAttribute(false)]
  public class ContactForm: WebPart {

    // Visual Studio might automatically update this path when you change the Visual Web Part project item.
    private
    const string _ascxPath = @ "~/_CONTROLTEMPLATES/15/devoworx_WebParts.WPs/ContactForm/ContactFormUserControl.ascx";

    protected override void CreateChildControls() {
      ContactFormUserControl control = Page.LoadControl(_ascxPath) as ContactFormUserControl;
      control.contactform = this;
      Controls.Add(control);
    }

    [WebBrowsable(true),
      WebDisplayName("SMTP Server"),
      WebDescription("Enter SMTP Server Ex: smtp.gmail.com"),
      Personalizable(PersonalizationScope.Shared),
      Category("Confguire Contact Form")

    ]
    public string SMTPServer {
      get;
      set;
    }
    [WebBrowsable(true),
      WebDisplayName("SMTP Port"),
      WebDescription("Enter SMTP Server Ex: 587"),
      Personalizable(PersonalizationScope.Shared),
      Category("Confguire Contact Form")
    ]

    public int SMTPPort {
      get;
      set;
    }

  }
}
OutPut

Applies To
- SharePoint 2016.
- SharePoint 2013.
- SharePoint 2010.

HI Qassas,
I need to access the property in the UserControl Page( UserControl.ascx.cs). can you please share the sample code
Pingback: How to set Order categories of custom toolpart » Rent in London
thanks mate, works like a charm!
Thanks a lot I understood how to define custom properties. Its really helpful
thanks, but how I can set default value ?
Hi Mary
There’s a default value attribute that unfortunately not working properly and there’s a work around here