In this article, we will learn How to use Bookmarks Pane Power BI feature in Power BI Desktop.

You might also like to read Install and Configure Power BI Report Server Step by Step
Bookmarks Pane Power BI
-
1
Bookmarks Pane Power BI
- 1.1 What’s Bookmarks Pane Power BI Feature?
- 1.2 How to use Bookmarks Pane Power BI?
- 1.3 Enable Power BI Preview features in Power BI Desktop
- 1.4 Add Bookmarks In Power BI Desktop
- 1.5 Update Bookmarks In Power BI Desktop
- 1.6 Show and Hide Visuals using Bookmarks Pane Power BI
- 1.7 View Bookmarks In Power BI
- 1.8 View Power BI Bookmark Page on Button Click
- 1.9 Reorder Bookmarks In Power BI
- 1.10 Delete Bookmarks In Power BI
What’s Bookmarks Pane Power BI Feature?
Bookmarks Pane is a new preview feature that announced in Power BI October 2017 update.
- It’s a powerful way to save and share out your insights.
- It lets you save interesting states as part of your report.
- It works as a report navigation for your report.
- It helps you to organize and make presentations of your report.
How to use Bookmarks Pane Power BI?
By default, the Bookmarks Pane Power BI is not available because of it’s still a preview feature.

Update: The bookmarks Pane feature is now a public feature in Power BI Desktop.
Enable Power BI Preview features in Power BI Desktop
To enable any Power BI Preview features, you should do the following:
Steps
- Open Power BI Desktop.
- File > Options and Settings > Options.
- From the left side, below Global > Select Preview Features.
- Check the Bookmarks preview feature.
- Go back to View tab > The Bookmarks Pane should be now shown.

Add Bookmarks In Power BI Desktop
In this example, we have a report that holds some Visualizations like a chart, table, and slicer for months, and we would like to create multiple pages with the same visuals filtered by a specific month from the slicer visual and show only specific charts.
In this case, instead of doing double and complex work by duplicating the current page multiple times for each slicer filer value as well as for each visual that you would like to show or hide,
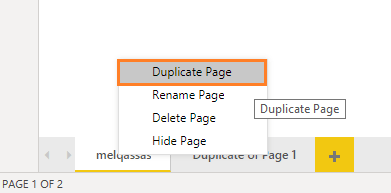
We can easily use Bookmarks Pane Power BI feature to smoothly achieve that by doing the following:
Steps
- Open your report via Power BI.
- Filter your report based on a selected slicer value.
- Go to View Tab > check the Bookmarks Pane option.
- Click add, and rename the bookmark as you prefer.
- Try now to filter with another value then go back to open Bookmarks Pane.
- Click on the saved bookmark to show your report based on the saved setting.

Note: When you add a bookmark to your report, it will include the following:
- The current page.
- Filters & Slicers & Sort order.
- Drill location.
- Any of the “focus” modes.
Update Bookmarks In Power BI Desktop
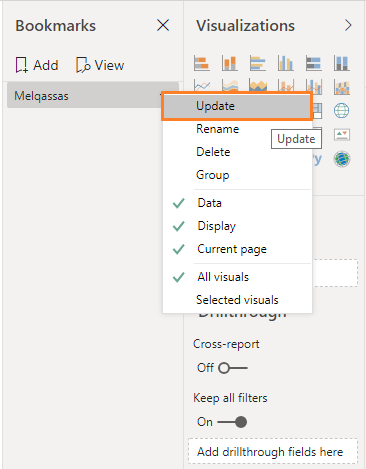
You should be aware of when you show or hide visual using selection pane or changing a filter setting for a visual level or page level or even at a slicer level, this filter will not be reflected automatically to the bookmark until you update your bookmark from bookmarks pane as shown below:
Show and Hide Visuals using Bookmarks Pane Power BI
The Bookmarks Pane Power BI is also a very smart choice when you need to show or hide a visual in your Power BI dashboard.
This is can be done by using Selection Pane to show or hide specific visuals, then use Bookmarks Pane to save a copy from the current dashboard view.
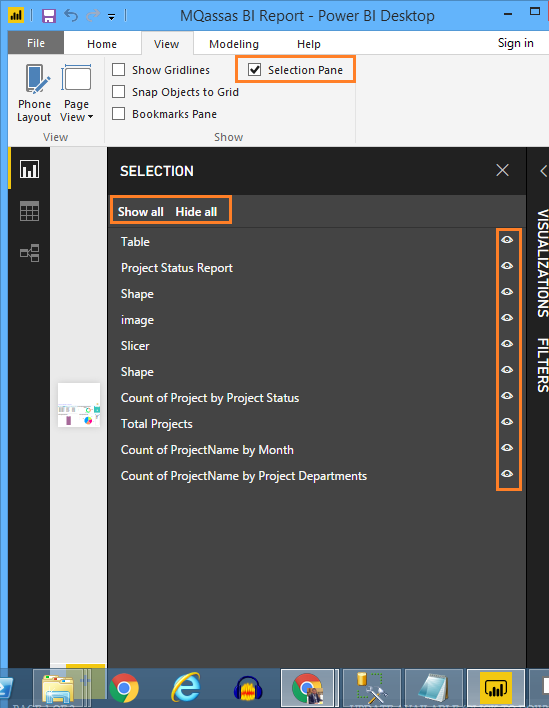
Check the details at Selection Pane Features In Power BI
View Bookmarks In Power BI
In the Bookmarks Pane, you can easily add multiple bookmarks and show it one by one.
You can also show your bookmarks as a story or in a presentation by using View option as the following:
Steps
- As above mentioned, add another bookmark with a new set.
- Click on the View option in the Bookmarks list to show your bookmarks with a navigation bar.
- Use the below navigation bar to go next and previous among your bookmarks.

Besides the view option, you can also view a specific bookmark page based on button click, by doing the following:
Steps
- At “Home” menu, Click on “Buttons”.
- Add a Blank button.
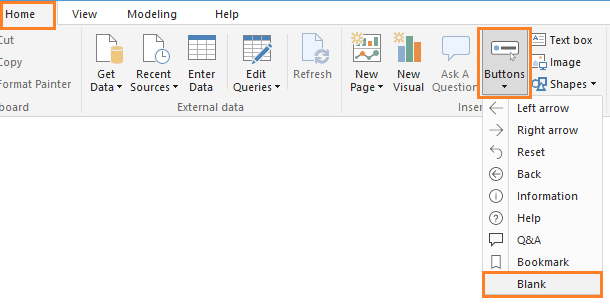
- In the button Properties, Turn action on.
- At action Type, Select “Bookmark”.
- At “Bookmark”, you will find a list of all created bookmarks that you have created using Bookmarks Pane Power BI feature.
- Select any bookmark as you prefer.

Reorder Bookmarks In Power BI
In the Bookmarks Pane Power BI feature, you can also reorder the saved bookmarks as you prefer. to do that you just need to drag the bookmark up and down as the following:
Steps
- Open your report Using Power BI Desktop.
- Go to View Tab > check the Bookmarks Pane option.
- The saved bookmarks should be shown, drag the bookmark up and down as you prefer.

Delete Bookmarks In Power BI
In the Bookmarks Pane Power BI feature, you can also delete the saved bookmark as the following:
Steps
- Open your report using Power BI Desktop.
- Go to View Tab > check the Bookmarks Pane option.
- The saved bookmarks should be shown, select your bookmark that you need to delete.
- Click on Eclipse ‘…’ > select delete to deleted the selected bookmark.

Conclusion
In conclusion, we have learned how to use Bookmarks Pane Power BI Feature.
Reference
Published by me at Microsoft TechNet: Power BI: Explore The New Bookmarks Pane Feature
Download
Follow me on GitHub to find the latest Power BI reports samples at PBIX samples with data source.
You might also like to read
- Power BI: Two Way To Get Data From SharePoint List / Library.
- Power BI: Determine The Project Status Based on the Project Start & Finish Date Using Calculated Column.
- Power BI: Show and Sort Slicer By Month or Quarter Name.
Have a Question?
If you have any related questions, please don’t hesitate to ask it at deBUG.to Community.

