In this post, we will learn How to temporarily Prevent and Lock Access to Site Collection for all anonymous users in SharePoint 2019.

Imagine the following scenario: you have a SharePoint site collection that is accessible to all anonymous users through the internet, and your business has decided to temporarily unpublish this site and prevent all anonymous users from accessing it without removing the entire site collection.
In this scenario, you do not need to work on site permissions and setup; instead, you must grasp the site locks choices supplied by SharePoint Central Administration in order to complete this activity in a secure and simple manner.
What’re Site Collection Quotas and Locks?
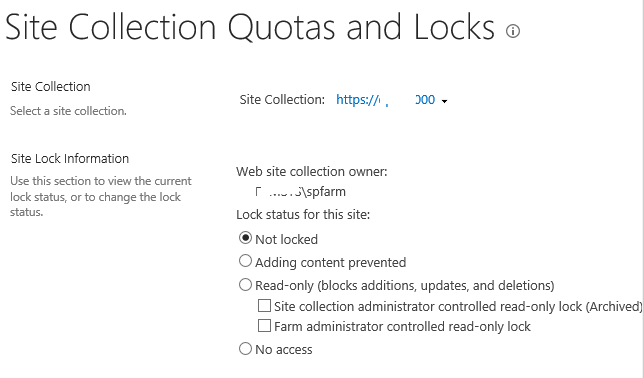
In SharePoint Server Central Administration, Site Collection Quotas and Locks helps you to manage Lock Access to Site Collection through 4 options:
- Not locked.
- Adding content prevented.
- Read-only
- No access

- Use this option, in case you need to prevent all users from accessing the site collection and its content.
- Use this option to to prevent users from adding new content to the site collection. however, updates and deletions are still allowed.
- In this option, users can view the site, however, they are prevented from adding, updating, or deleting content
- This option helps you to rollback other locks options and unlock the site collection and make it available to users.
Note: You must be a member of the Site collection Administrator for this site collection to can manage Quotes and Locks.
After you’ve grasped the concept of SharePoint Site Locks,, let’s know know How you can configure the site locks settings in SharePoint 2019 by doing the following:
Steps
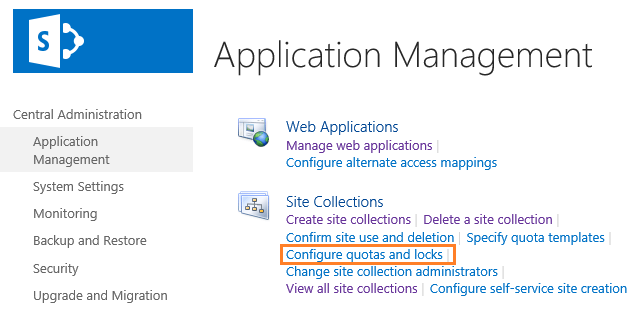
- Open SharePoint Central Administrator.
- Click on Application Management > Site Collection > Configure quotas and locks.

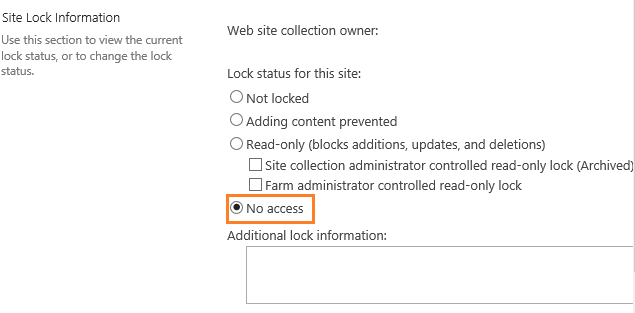
- In Site Collection Quotas and Locks,
- Choose the site collection that you would like to prevent all users to access,
- Choose “No Access” to Lock Access to Site Collection and prevent users from accessing the site collection and its content.

Besides, the SharePoint Central Administration, you can also Lock access to site collection and manage Site locks using PowerShell as stated below:
To prevent users from accessing the site collection and its content using the PowerShell, you can use the below steps:
- Run SharePoint 2019 Management Shell as Administrator.
- Type the below cmdline with your Site Collection URL
Set-SPSite -Identity http://SiteCollectionURL/ -LockState NoAccess To set the site collection as a Read-Only in PowerShell, you can use the below steps:
- Run SharePoint 2019 Management Shell as Administrator.
- Type the below cmdline with your Site Collection URL
Set-SPSite -Identity http://SiteCollectionURL/ -LockState ReadOnly To prevent users from adding new content to the site collection. however, updates and deletions are still allowed in PowerShell, you can use the below steps:
- Run SharePoint 2019 Management Shell as Administrator.
- Type the below cmdline with your Site Collection URL
Set-SPSite -Identity http://SiteCollectionURL/ -LockState NoAdditionsTo unlock the site collection again in PowerShell, you can use the below steps:
- Run SharePoint 2019 Management Shell as Administrator.
- Type the below cmdline with your Site Collection URL
Set-SPSite -Identity http://SiteCollectionURL/ -LockState Unlock In SharePoint Online, you can also lock access to Site Collection by running the below cmdlet in SharePoint Online PowerShell
Set-SPOSite https://melqassas.sharepoint.com/sites/DemoSites -lockstate NoAccessConclusion
Site Collection Locks is an excellent option in SharePoint 2019 and SharePoint Online for locking access to site collections and preventing all users from temporarily accessing the site without deleting it.

