In this detailed installation guide, you will learn How to Install and Configure Workflow Manager SharePoint 2016 / 2019 step by step.
- 1 How to Install and Configure Workflow Manager SharePoint 2016 / 2019 Step By Step?
-
2
SharePoint 2019 Workflow Manager Prerequisites
- 2.1 1) Configure App Management Service
- 2.2 2) Configure SharePoint Workflow Manager Service Accounts and Admin Group
- 2.3 3) Add Workflow Manager Setup Account to the Local Administrator Group
- 2.4 4) SQL Permissions for SharePoint Workflow Manager Service Account
- 2.5 5) The Ports Required for SharePoint Workflow Manager
- 3 Download Workflow Manager SharePoint 2016 / 2019
- 4 Install Workflow Manager SharePoint 2016 / 2019
-
5
Configure Workflow Manager SharePoint 2019 / 2016 Step by Step
- 5.1 1) Configure Farm Management Database
- 5.2 2) Configure Instance Management Database
- 5.3 3) Configure Resource Management Database
- 5.4 4) Configure Workflow Manager Service Account
- 5.5 5) Configure Workflow Manager Certificates
- 5.6 6) Configure Workflow Manager Ports
- 5.7 7) Configure Workflow Manager Admin Group
-
6
Configure Service Bus for Workflow Manager SharePoint 2016 / 2019
- 6.1 1) Configure Service Bus Management Database
- 6.2 2) Configure Service Bus Gateway Database
- 6.3 3) Configure Message Container Database
- 6.4 4) Configure Service Bus Service Account
- 6.5 5) Configure Service Bus Certificate
- 6.6 6) Configure Service Bus Ports
- 6.7 7) Configure Service Bus Admin Group
- 6.8 SharePoint 2016 Workflow Manager Configuration Summary
- 7 Install Workflow Manager Client
- 8 Register SharePoint 2016 Workflow Manager Service
- 9 Test SharePoint 2016 Workflow Manager
Before we getting started to install and configure Workflow Manager for SharePoint 2019 as well as SharePoint 2016, you should be firstly aware of the following notes and considerations:
- The Workflow Manager can be deployed as a part of a SharePoint farm or as a separate farm.
- The supported Workflow Manager topology consists of 1 server or 3 servers.
- Only 3 servers workflow farm topology provides High Availability.
- The farm with 2 or 4 servers can be built! However, it’s NOT supported, and it will NOT provide High Availability.
- The “OAuth 2” is the authorization protocol between the SharePoint and Workflow Manager that requires SSL. Therefore, It’s strongly recommended to use HTTPs for the production environment.
- App Management Service is a mandatory prerequisite for Workflow Manager.
- The Workflow Manager accounts must be domain users, the built-in accounts are NOT supported.
- Don’t use the same account for setup and service.
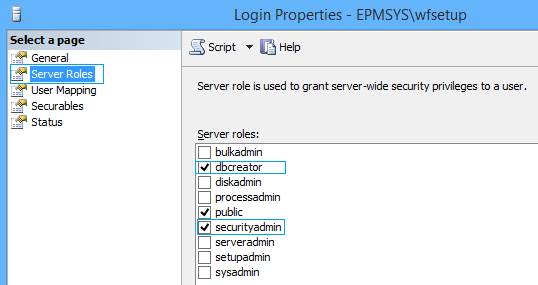
- The SQL Server Permissions for the workflow manager setup account
- DB creator.
- security admin.
- As a part of SharePoint Farm deployment.
- It doesn’t matter to install the workflow manager on the WFE Servers or App Servers.
- I would prefer to install the Workflow Manager on one of the App Servers and install the Workflow Manager Client on all other SharePoint Servers.
- It’s strongly recommended to use the default ports.
- It’s NOT recommended to use the “BUILTIN\Administrators” group as Workflow Manager Admin Group.
- You must install the Workflow Manager Client on all SharePoint Servers to handle the communication with the Workflow Manager.
- You can’t use Workflow Manager for SharePoint Foundation 2013.
You might also like to read Workflow Manager Health Checklist.
In SharePoint 2019 / 2016, you have two options to configure Workflow Manager SharePoint 2016 / 2019:
- A part of the SharePoint farm and the communication occurs by using HTTP or HTTPs.
- A separate workflow manager farm that must consist of 1 server or 3 servers and the communication occurs by using HTTP or HTTPs.
Although the second option is the recommended one. However, it may be costly for some organizations! Therefore, it will depend on the current organization requirements (Performance & Availability ..etc) and its budget, to be able to decide which option you would go through.
Remember: in the second option, the Workflow Manager Farm must consist of one server or three servers. (Not 2 or 4 …etc).
Note: The farm with 2 or 4 servers can be built but it’s NOT supported, and it will NOT provide High Availability. Only 3 servers workflow farm topology provide high availability.
It’s strongly recommended to use HTTPs for production environment.
In this section, we will list the prerequisites to install and configure workflow manager SharePoint 2016 step by step that are the same prerequisites to install SharePoint 2019 Workflow Manager:
- Configure App Management Service.
- Configure Workflow Manager SharePoint 2016 Service Accounts and Admin Group.
- Add SharePoint 2016 Workflow Manager Setup Account to the Local Administrator Group.
- Provide SharePoint 2016 Workflow Manager Service Account Permissions in SQL Server.
- List SharePoint 2016 Workflow Manager Ports Required.
1) Configure App Management Service
The “OAuth 2″ is the authorization protocol between the SharePoint and Workflow Manager which requires configuring the App Management Service before installing and configure Workflow Manager SharePoint 2016 / 2019.
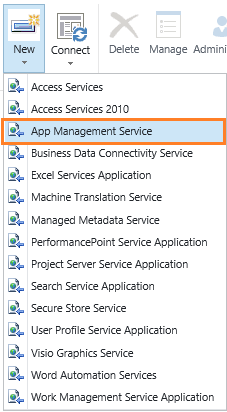
To configure App Management Service, Please check Sorry, something went wrong App Management Shared Service Proxy is not installed.
In Active Directory, Create the below Workflow Manager Objects.
- Setup Account (WFSETUP).
- To install and configure the Workflow Manager.
- Service Account (WFSRV).
- To run the Workflow Manager Services
The Workflow Manager accounts must be domain users, the built-in accounts are NOT supported.
Don’t use the same account for setup and service.
- Workflow Manager Administrator Group (WFADMIN).
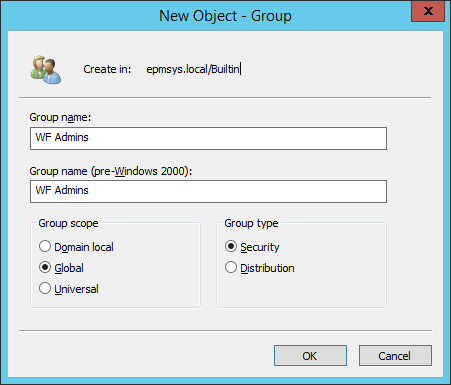
Don’t
forget to add the Workflow Manager Service Accounts and the Farm Account to this group.Check the detail steps to create the Service Accounts and Admin Group for Workflow Manager farm.
3) Add Workflow Manager Setup Account to the Local Administrator Group
Regardless, you will install the Workflow Manager as a Part of SharePoint farm or as a separate farm. you must add the Workflow Manager Setup Account to the Local Administrator Group in the Workflow Manager server.
Steps
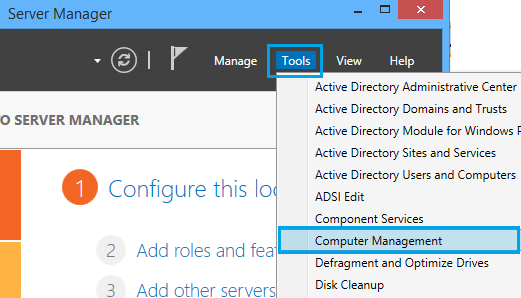
- Open Server Manager.
- Tools > Computer Management.
- In Local Users, and Groups, click on the Administrator Group and add the workflow manager Setup Account.
If you are going to install the workflow manager as a part of the SharePoint farm. It doesn’t matter to install the workflow manager on the WFE Servers or App Servers. But I would prefer to install the Workflow Manager on one of the App Servers and install the Workflow Manager Client on all other SharePoint Servers.
To install Workflow Manager 2019 for SharePoint 2019 or SharePoint 2016, the Workflow Manager Setup account must have “
To grant the Workflow Manager Service Account the required SQL server permission, you should do the following:
Steps
- Open SQL Server Management Studio.
- Go to Security > Logins > New Login.
- In the Login Dialog,
- Click on the “Search” button to add the Workflow Setup Account.
- Go to “Server Roles”, Check the “
dbcreator ” & “securityadmin ” role.
- First of all, it’s strongly recommended to use the default Workflow Manager Ports.
- 12290 for HTTPS.
- 12291 for HTTP.
- Second, you should make sure that the SQL Server Port (1433 default) is opened.
- Additionally, you should make sure that the SQL Server instance is reachable on the Workflow Manager Servers as mentioned at How to Check SQL Server Instance Connectivity from the application server to the database server for a specific user.
To download SharePoint Workflow Manager 2019 / 2016, you should first download and install Microsoft Web Platform as the following:
Download Microsoft Web Platform
- Firstly, log in to the server that you will use to install the Workflow Manager by the Workflow Setup Account.
- Secondly
, download the Microsoft Web Platform Installer 5.1.
Install Microsoft Web Platform Installer 5.1
- Double click on the downloaded file to install it.
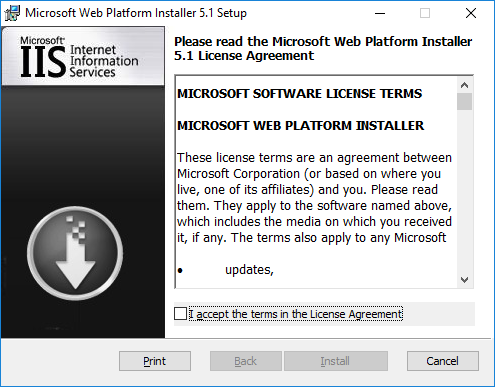
- Check “I accept”, then click “Next”.
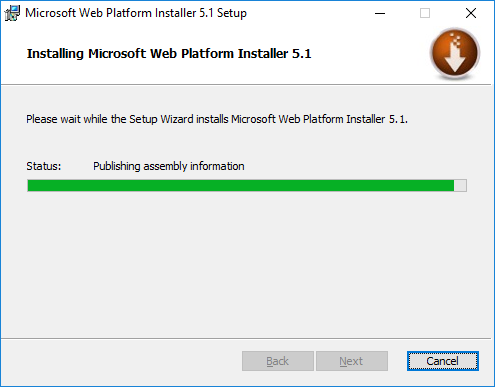
- Wait a moment till the installation completed, then click “Next”.
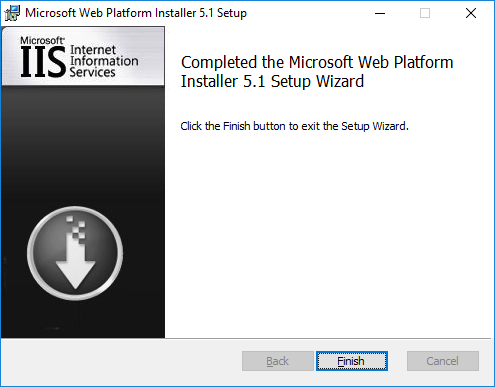
- Click “Finish”.
To install Workflow Manager for SharePoint 2016 / 2019, you should follow the below steps:
Steps
- Open the Microsoft Web Platform Installer 5.1.
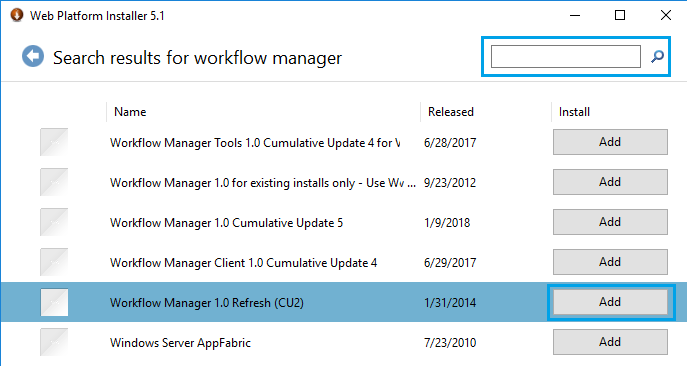
- Click on the “Products” tab, Search for “Workflow Manager“.
- At “Workflow Manager 1.0 Refresh (CU2)“, click on “Add”.
- Then, click on “Install”

- Click on “I Accept”.
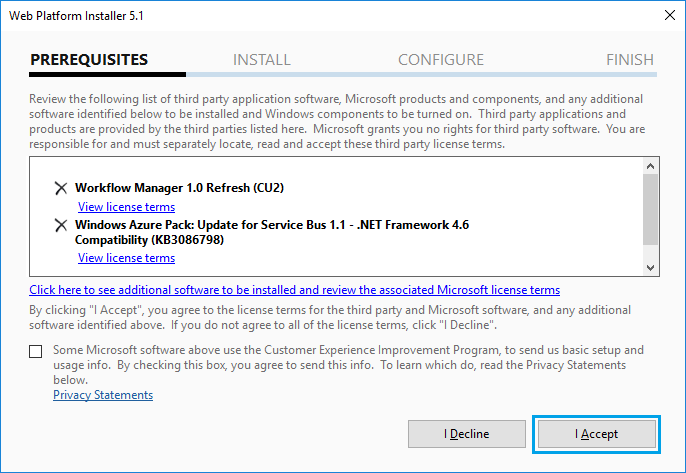
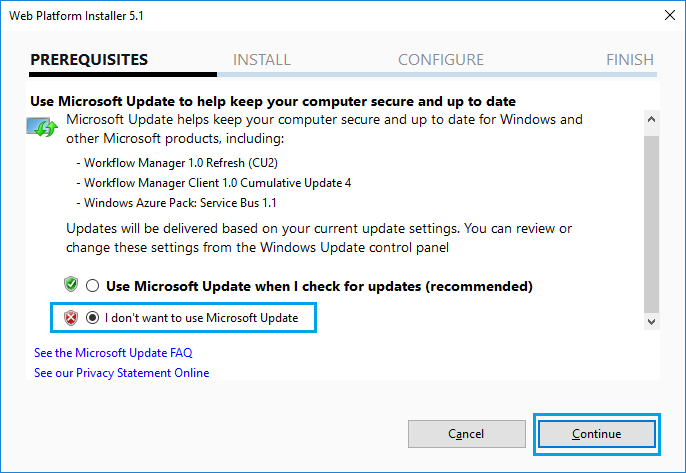
- Then, check “I don’t need to use Microsoft Update”.
- Finally, Click on “Continue”.
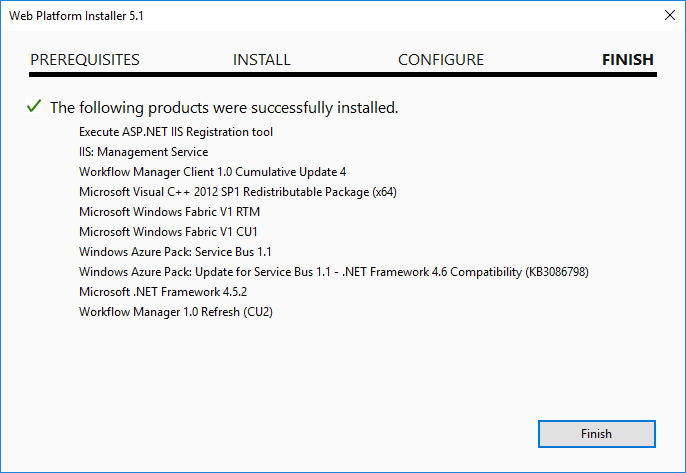
- Wait a moment until the installation completed successfully.
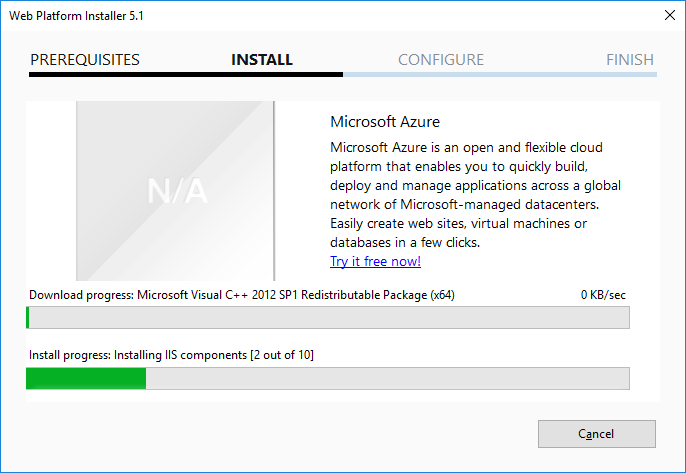
- Click “Continue”.
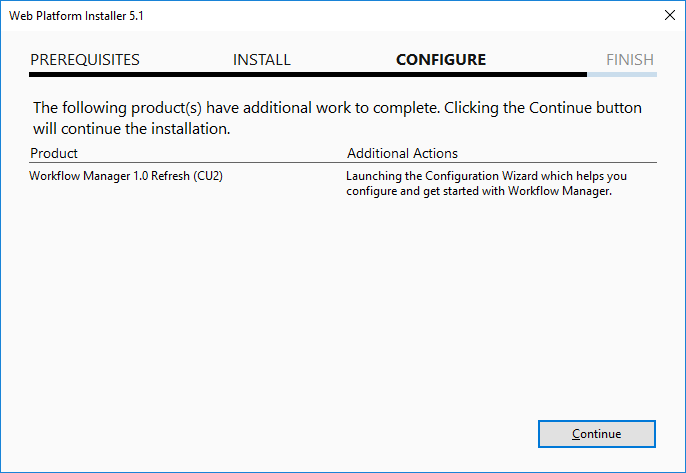
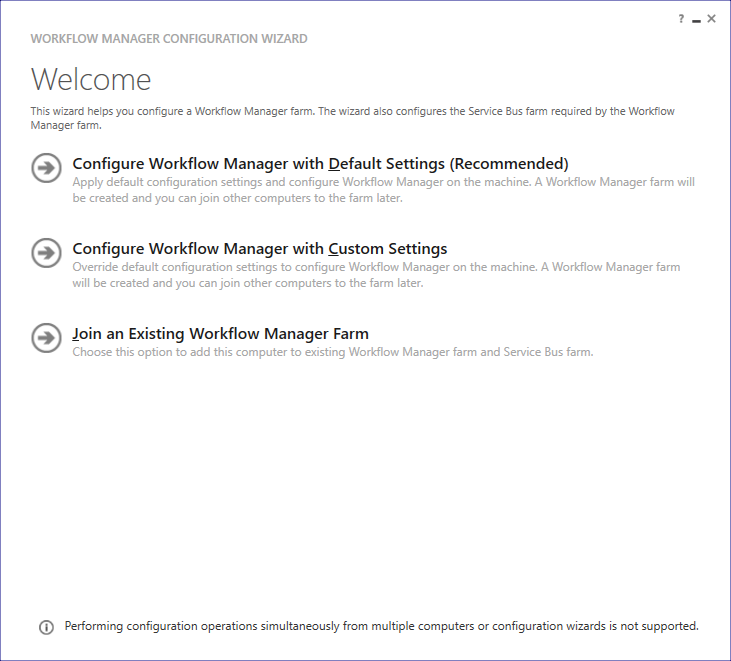
- The Workflow Manager Wizard will be opened! but we still didn’t finish the installation step, so you should close it.
- Click “Finish”.
Install Workflow Manager 1.0 Cumulative Update 5
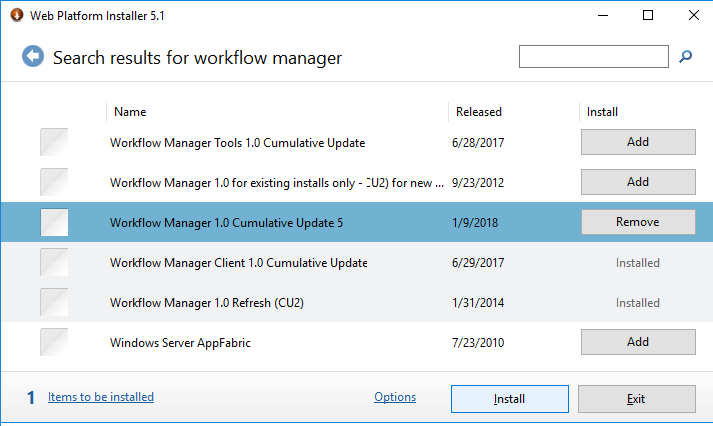
- Close the Microsoft Web Platform Installer and reopen it again.
- Click on the “Products” tab, search for “Workflow Manager 1.0”.
- At “Workflow Manager 1.0 Cumulative Update 5“, click on “Add”.
- Click on “Install”.
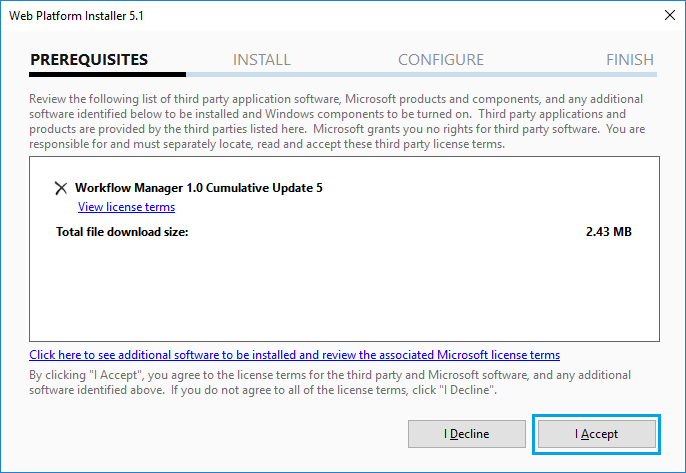
- Click on “I Accept”.
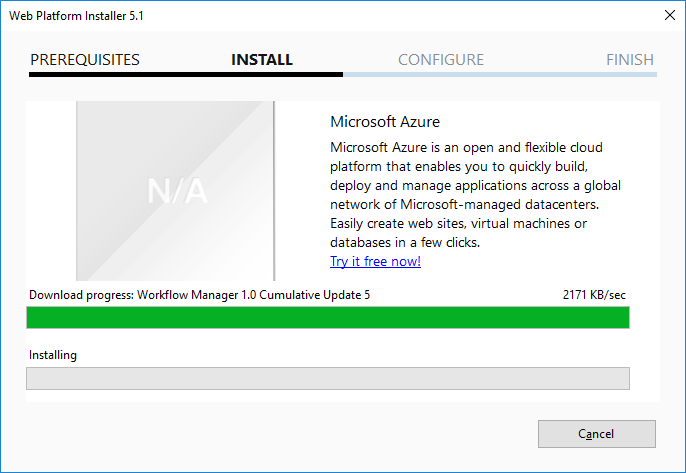
- Wait a moment until the installation completed.
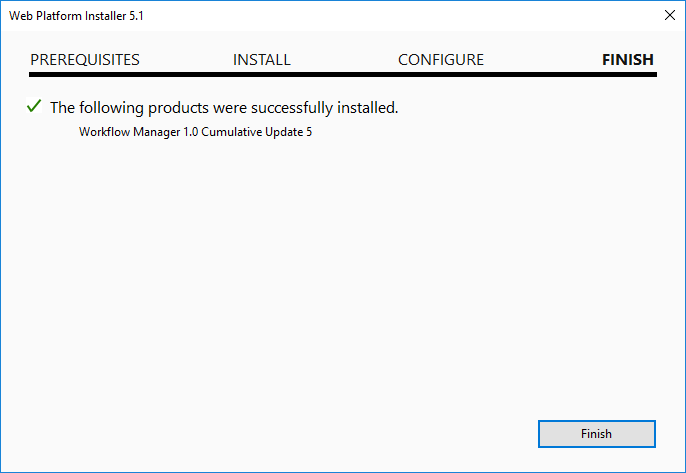
- Click on “Finish”.
In this section, we’re going to configure Workflow Manager SharePoint 2016 step by step by doing the following:
- Configure Farm Management Database.
- Configure Instance Management Database.
- Configure Resource Management Database.
- Configure Workflow Manager Service Account.
- Configure Workflow Manager Certificates.
- Configure Workflow Manager Ports.
- Configure Workflow Manager Admin Group.
Steps
- Make sure that the current login account is the Workflow Manager Setup Account.
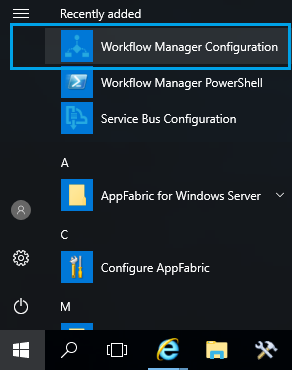
- Open the Workflow Manager Configuration from the Start Menu.
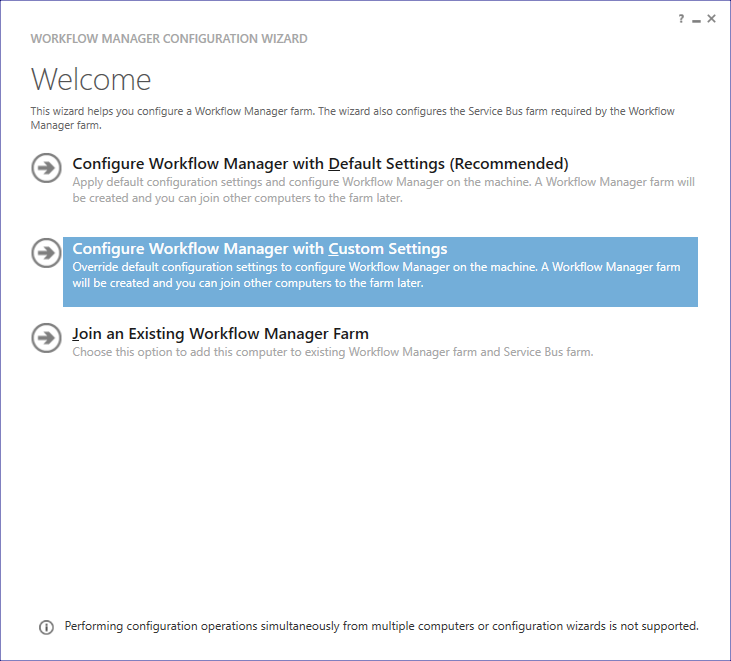
- Click on “Configure Workflow Manager With Custom Settings“
The Workflow Manager has three databases:
- Farm Management Database.
- Instance Management Database.
- Resource Management Database.
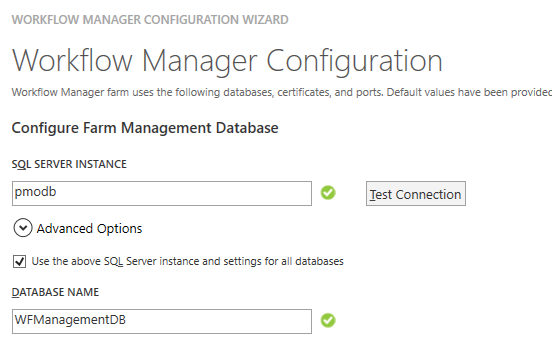
1) Configure Farm Management Database
- Type the SQL Server Instance, click on “Test Connection”.
- In “Authentication”, select “Windows Authentication”.
- Check “Use the above SQL Server Instance and All Settings For All Database”.
- Leave the default database name, or change it as you prefer.
If you face any connection issue, please make sure that the WorkFlow server can reach the SQL Server as mentioned at
How to Check SQL Server Instance Connectivity from the application server to database server for a specific user.
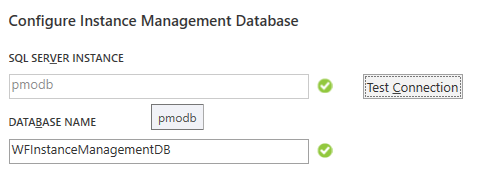
2) Configure Instance Management Database
- If you checked on “Use the above SQL Server Instance and All Settings For All Database“. the same instance will be used to host all the workflow databases.
- Leave the default database name, or change it as you prefer.
3) Configure Resource Management Database
- Leave the default database name, or change it as you prefer.
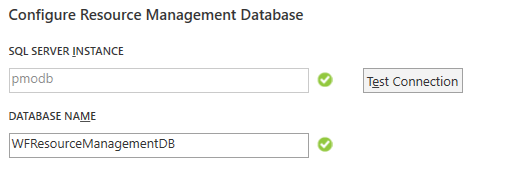
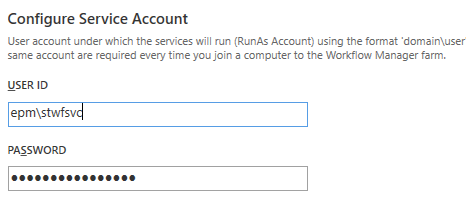
4) Configure Workflow Manager Service Account
- Add the Workflow Manager Service Account “RunAsAccount” that created in the prerequisites step.
5) Configure Workflow Manager Certificates
As we have above mentioned,
The SharePoint interacts with Workflow Manager through the “OAuth 2” protocol that requires SSL. Therefore, Microsoft strongly recommends to use HTTPS for the production environment.
So, if you have an SSL certificate, don’t check “Auto-generate” and provide your custom SSL certificates!
Otherwise, if you don’t have a custom certificate and it’s not a production deployment, you would check “Auto-generate” to auto-generate a certificate. But in this case, you will get a certificate warning and the workflow API maybe doesn’t work as expected. therefore, you will need to allow HTTP when you register the workflow manager service.
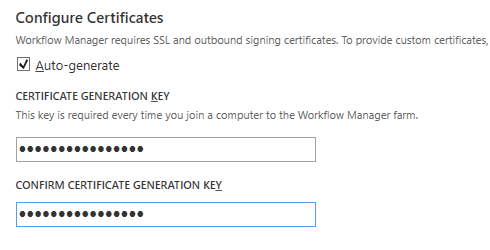
The certificate generation key is very important and mandatory required when you remove or join a new server to the Workflow Manager farm.
6) Configure Workflow Manager Ports
I recommend using the default ports
- HTTPs Port: 12290.
- HTTP Port: 12291.
The Workflow Manager uses these ports to listens for management requests.
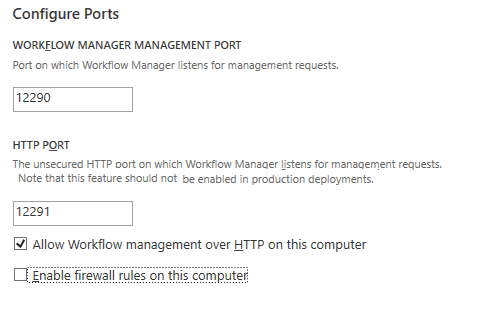
In a Production deployment, DON’T “Allow Workflow management over HTTP on this computer“.
If the Windows firewall is ON, and you have checked “Enable the firewall rules on this computer” option, it will be automatically configured.
7) Configure Workflow Manager Admin Group
Add the Workflow Manager Admin group that we have already created in the SharePoint Workflow Manager prerequisites section. but you should note that:
- The users in this group will be granted access to all workflow manager databases.
- DON’T use the “BUILTIN\Administrators” group, additionally, DON’T forget to restart the server.

The service bus is a messaging service that works as a broker to guarantee messaging delivery between the workflow manager and SharePoint.
The Service Bus has three databases:
- Farm Management Database.
- Gateway Database.
- Message Container Database.
In this section, we’re gonna configure Service Bus for Workflow Manager SharePoint 2016 by doing the following:
- Configure Service Bus Management Database.
- Configure Service Bus Gateway Database.
- Configure Message Container Database.
- Configure Service Bus Service Account.
- Configure Service Bus Certificate.
- Configure Service Bus Ports.
- Configure Service Bus Admin Group.
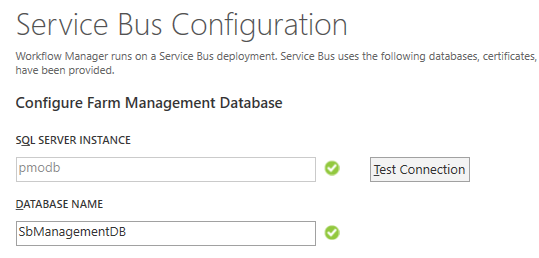
1) Configure Service Bus Management Database
- If you checked on “Use the above SQL Server Instance and All Settings For All Database“. the same instance will be used to host all the workflow databases.
- Leave the default database name or change it as you prefer.
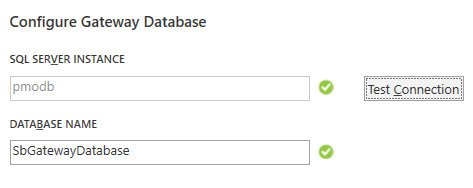
2) Configure Service Bus Gateway Database
- Leave the default database name or change it as you prefer.
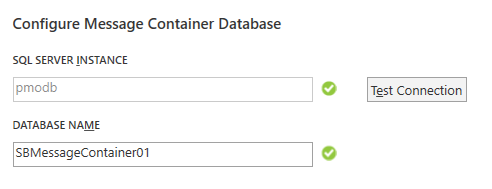
- Leave the default database name or change it as you prefer.
4) Configure Service Bus Service Account
- Check “Use the same service account credentials as provided for Workflow Manager“.

5) Configure Service Bus Certificate
- In production deployment, Provide a custom certificate.

This key is very important and mandatory required when you remove or join a new server to the Service Bus farm.
6) Configure Service Bus Ports
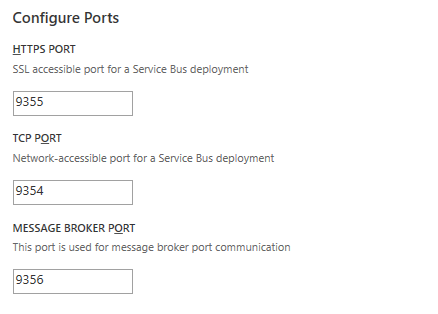
I recommend using the default ports.
- HTTPS Port: 9355.
- TCP Port: 9354.
- Message Broker Port: 9356.
- Internal Communication Port Range: 9000.
You might also like to read Get SharePoint Workflow Manager Ports
7) Configure Service Bus Admin Group
- Add the same workflow manager admin group.

As we earlier mentioned, please, don’t use the “BUILTIN\Administrator” group.
- Once the configuration settings finished, click “Next” to check the setting summary.
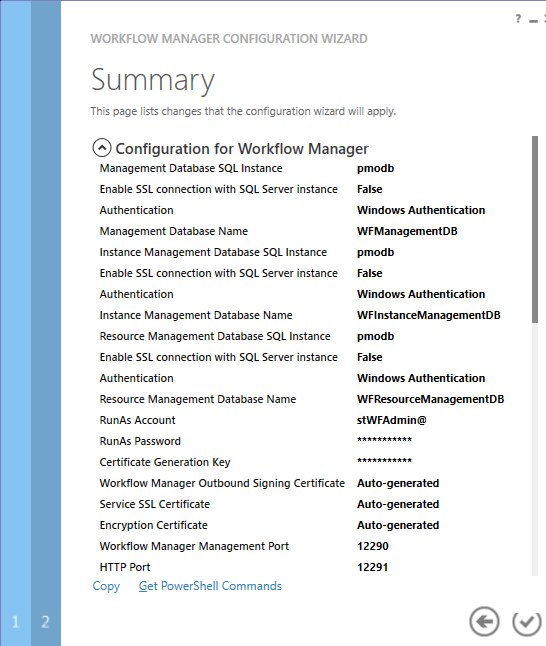
- Review the summary carefully, then click on the “True” button to apply the configuration settings.
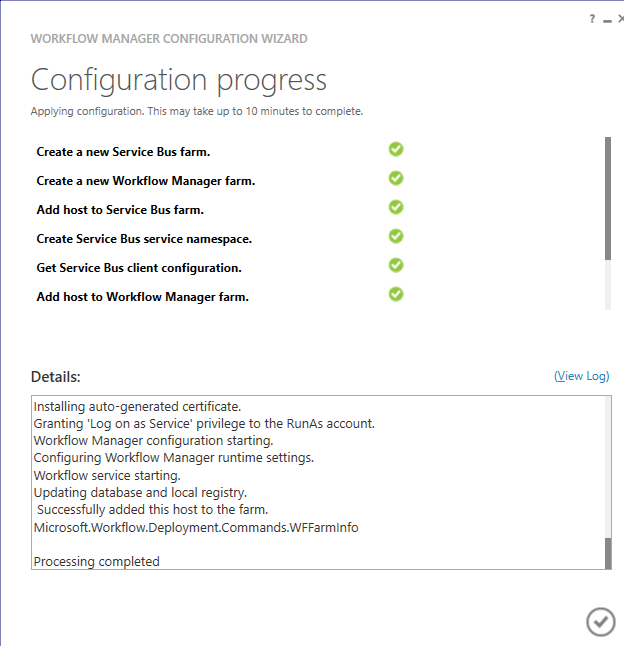
In this step, you may encounter this issue”Workflow Manager Port number specified for internal communication Port Range is blocked.“, to solve this issue, you should check Workflow Manager Port Range is blocked.
Install Workflow Manager Client
You must install the Workflow Manager Client on all SharePoint Servers to handle the communication with the Workflow Manager.
The Workflow Manager Client is required on all SharePoint Server to can register the SharePoint Workflow Service successfully.
If you have configured the Workflow Manager as a part of the SharePoint farm, No need to install the Workflow Manager Client on the server that you have configured the workflow manager on it, it’s already bundled installed.
Steps
- Login to all SharePoint Servers using Workflow Set up Account.
- Open the “Microsoft Web Platform Installer”.
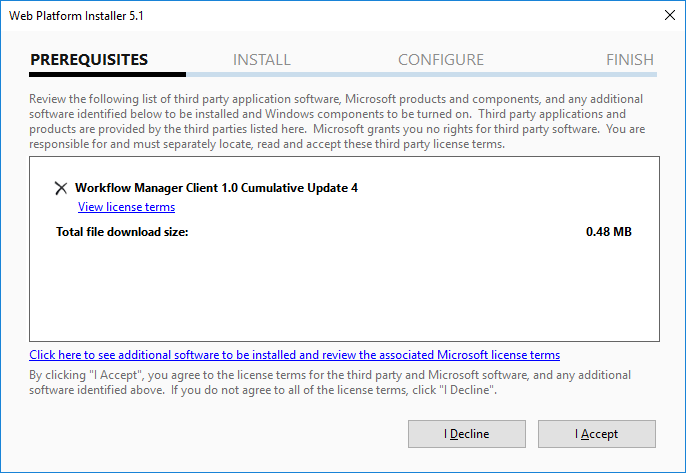
- Go to “Products” tab, Search for “Workflow Manager Client 1.0 Cumulative Update 4“.
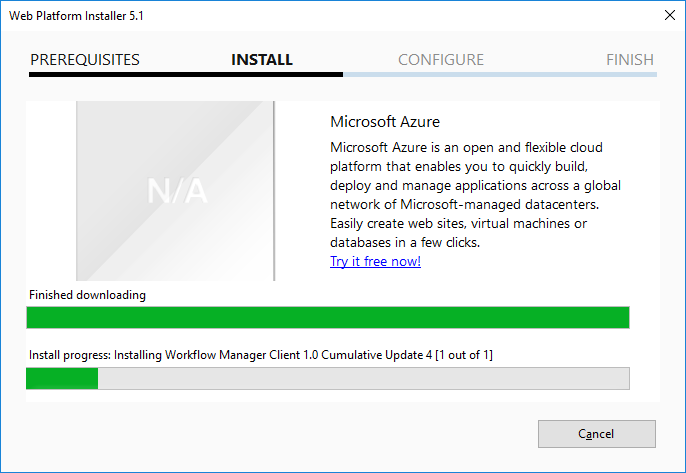
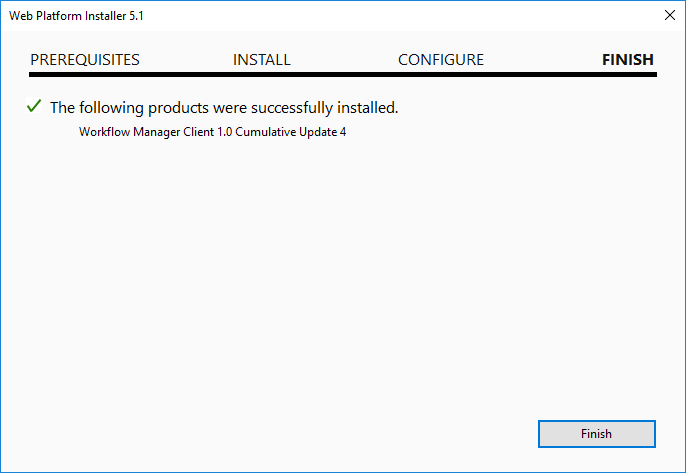
- Click “Add”, then “Install”.
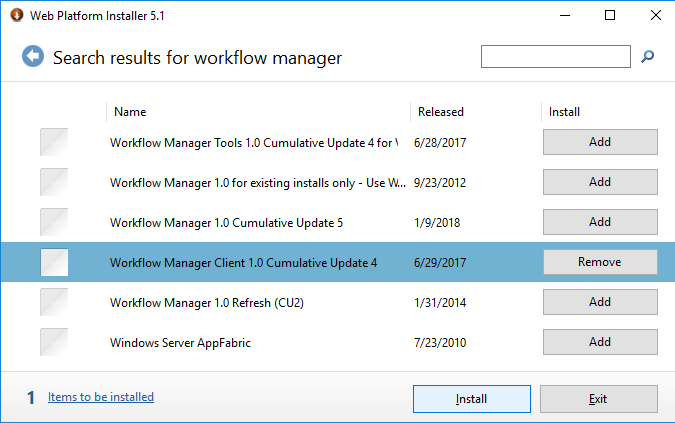
- Check “I don’t want to use Microsoft Update“, Continue.
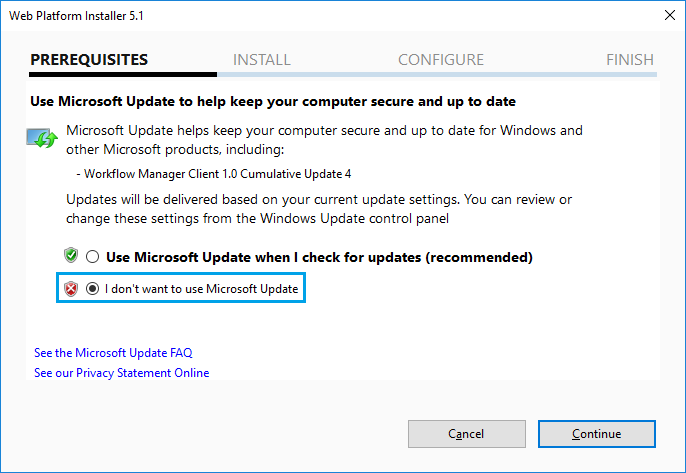
In case you have configured the Workflow Manager with SSL certificate, so you must export and import the Workflow Manager Certificate to the SharePoint Server by doing the following:
- Export Workflow Manager SSL Certificate.
- Import Workflow Manager SSL Certificate.
- Add Workflow Manager Certificate to Trust Relationship.
1) Export Workflow Manager SSL Certificate
- Login to the server where the Workflow Manager 2019 has been installed.
- Open IIS Manager > Sites > Click on “Workflow Management Site”.
- From the right side, in the Actions bar and below Edit Site> Click on “Bindings”.
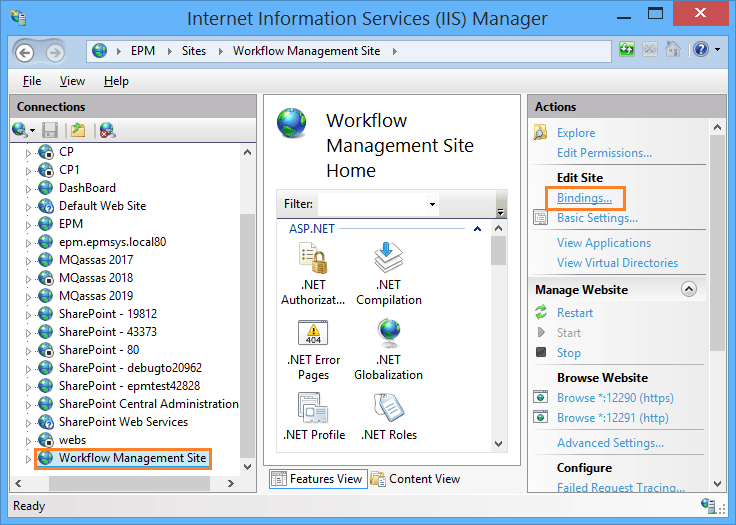
- Select the HTTPS entry, Click on “Edit”.
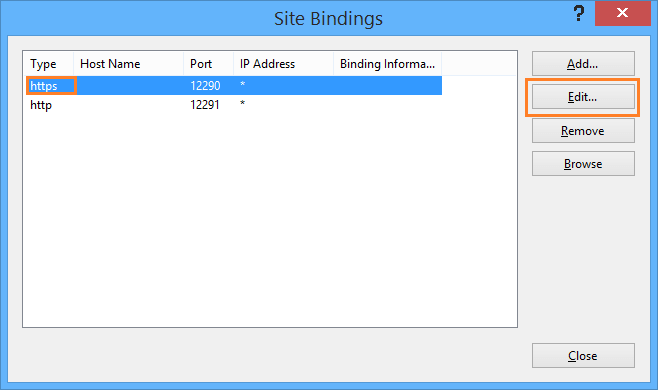
- Click on “View”, to view the Workflow Manager certificate details.
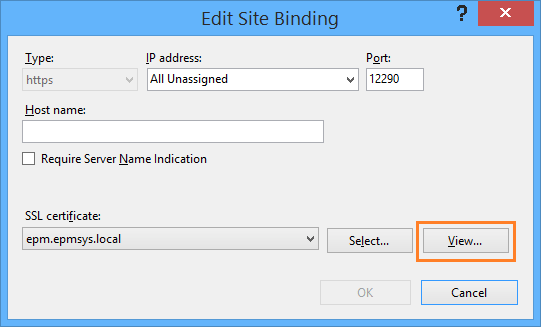
- Click on “Details” tab > then click on “Copy to file” button.
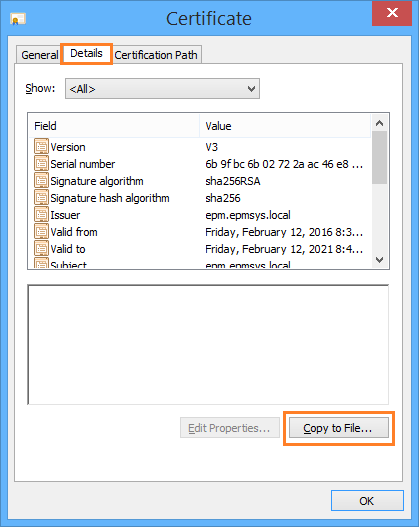
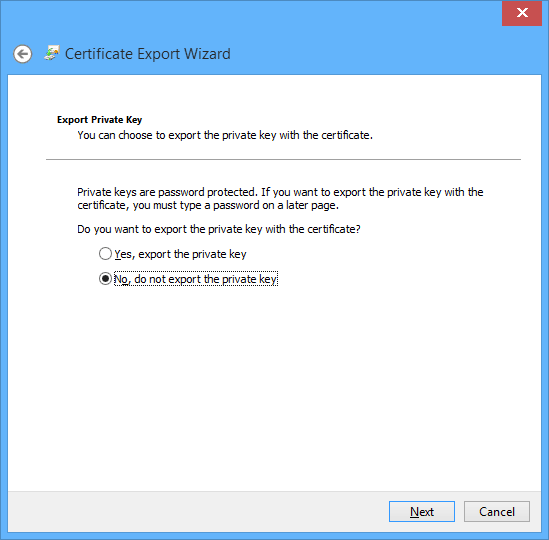
- The certificate export wizard should be opened, Click Next.
- Leave the default selection “No, don’t export the private key”.
- In Export file format, leave the default selection.
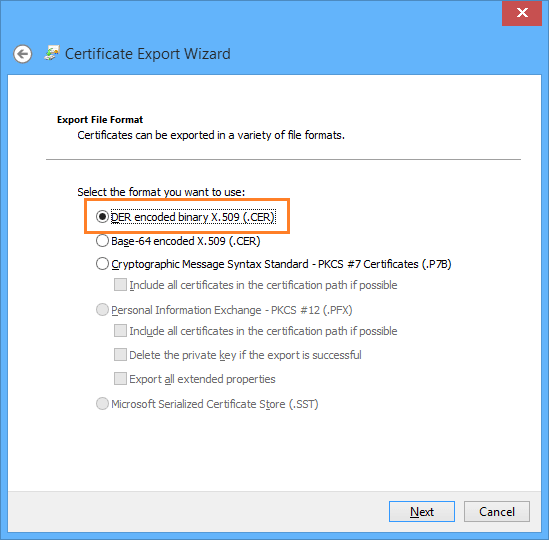
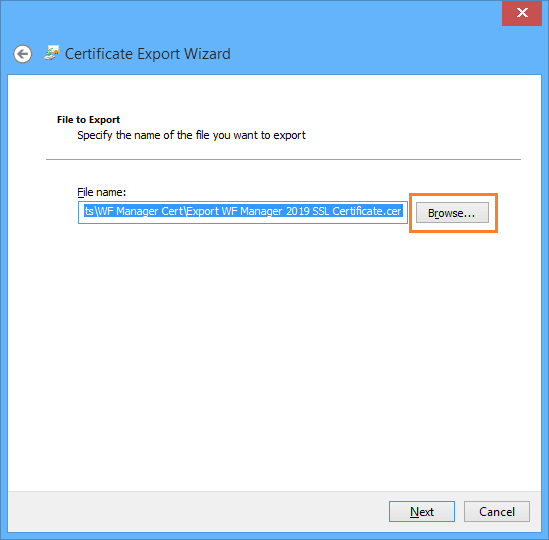
- Browse to specify the save location, and provide a name for your exported certificate file.
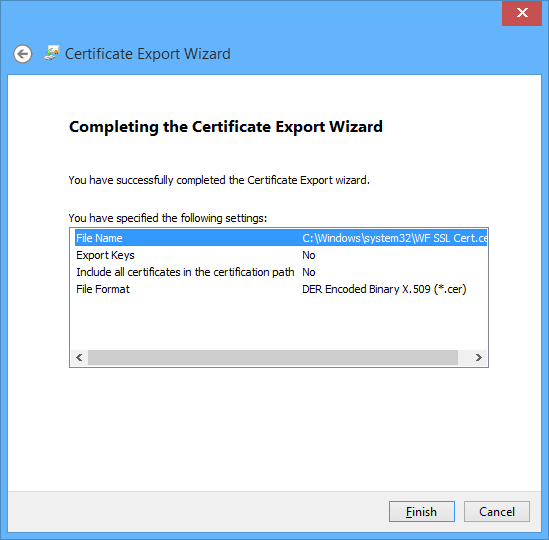
- Review the summary and click Finish.
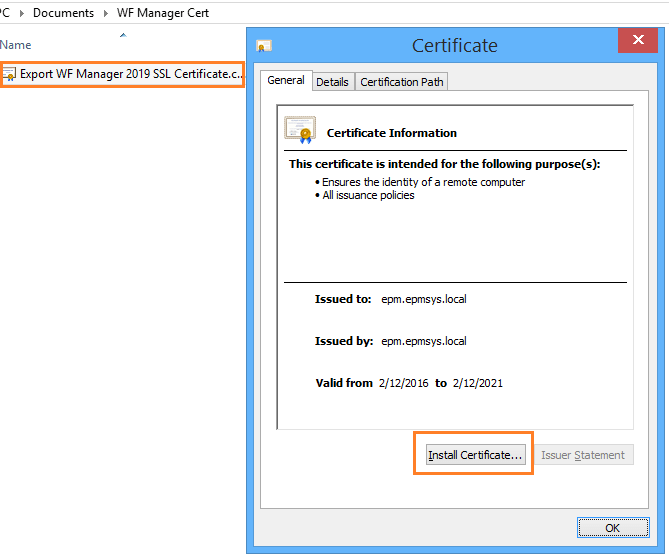
- Copy the exported workflow manager certificate to all SharePoint Servers cross the farm.
- Double click on the SSL certificate file to install it.
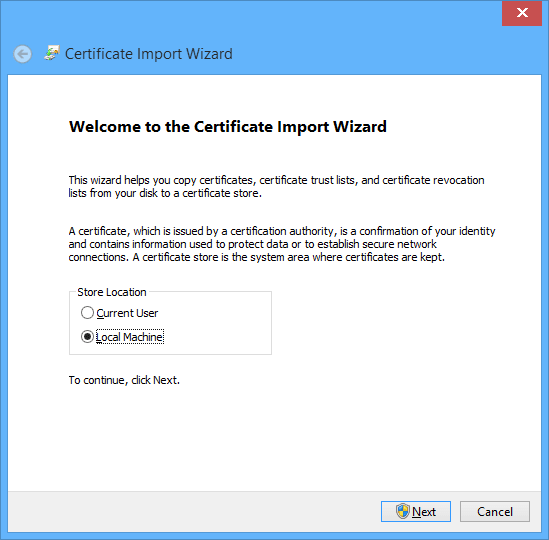
- In store location, click on “Local Machine” > Next.
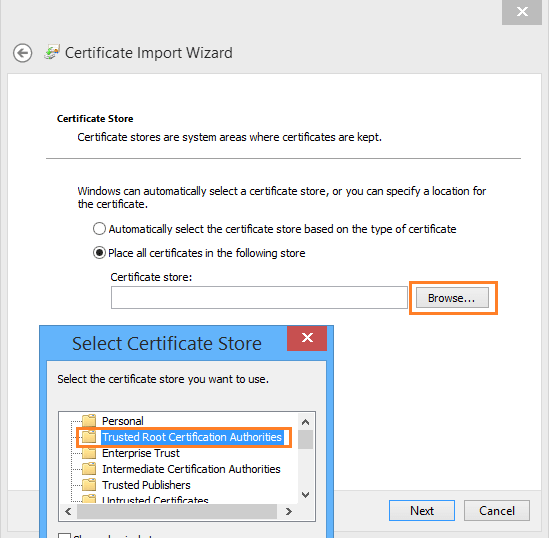
- Place the Workflow Manger 2019 certificate in the Trusted Root Certification Authorities.
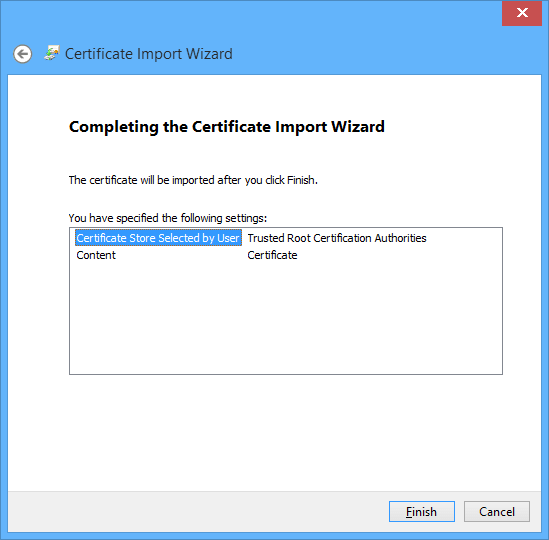
- Click Finish to complete the import certificate wizard.
3) Add Workflow Manager Certificate to Trust Relationship
- Open Internet Explorer as Administrator > Open SharePoint Central Administration.
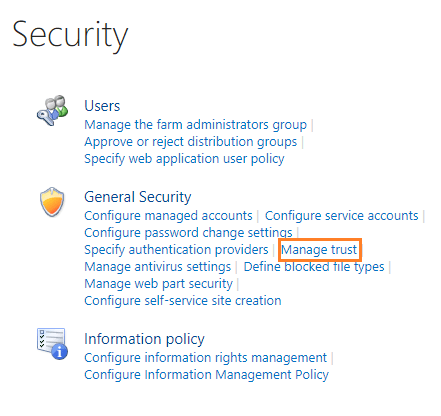
- Click on “Security” > “General Security” > “Manage Trust”.
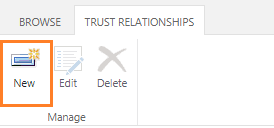
- Click New to establish a trust relationship.
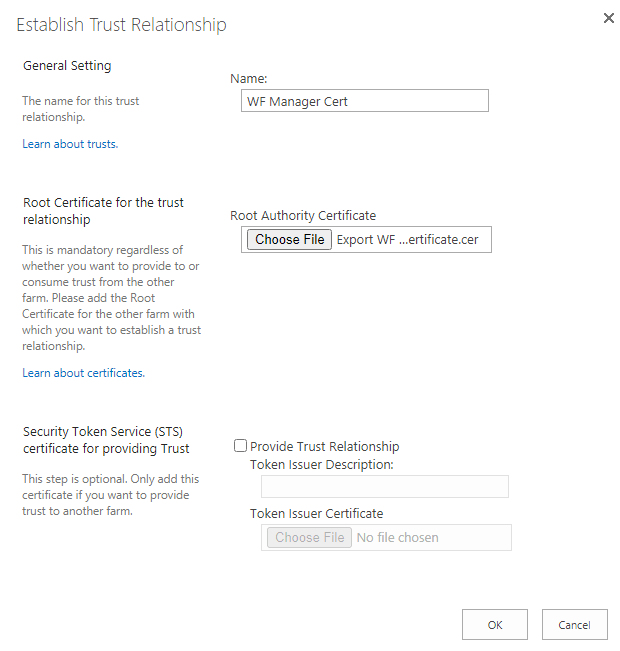
- Browse and select your certificate file > OK.
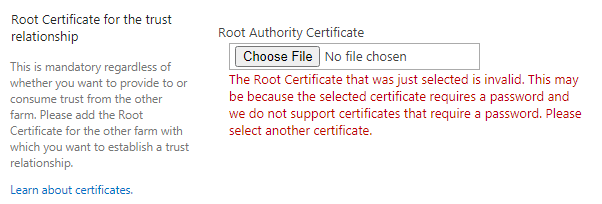
Make sure that you are using Internet Explorer, not Google Chrome / Firefox to avoid this error The Root Certificate that was just selected is invalid. This may be because the selected certificate requires a password and we do not support certificates that require a password. Please select another certificate.
After installing and configuring Workflow manager for SharePoint 2016 / 2019, you should register SharePoint Workflow Service by doing the following:
Steps
- Login to the SharePoint Server that you have used to install the Workflow Manager using Farm Account.
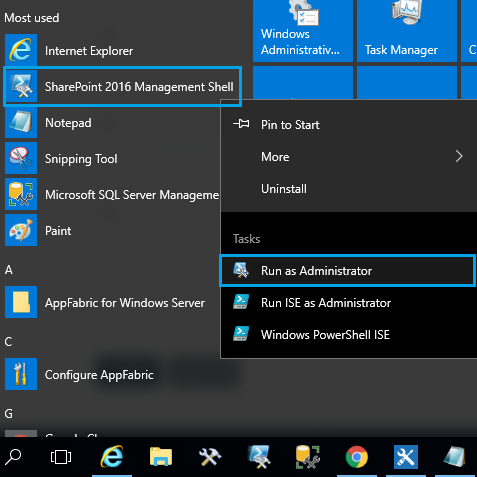
- Run SharePoint Power Shell As Administrator.
Register Register-SPWorkflowService Common Issues
Before you go to register SharePoint Workflow Service, it’s strongly recommended to check the below common issue that you may face when you run Register-SPWorkflowService:
- Failed to query the OAuth S2S metadata endpoint at URI.
- The Caller doesn’t have the necessary permissions required for this operation.
- Register-SPWorkflowService: Timeout Issue.
- Register-SPworkflowservice unable to connect to the remote service at Workflow Manager 2016.
Register Workflow Service Over HTTPs
Register-SPWorkflowService -SPSite https://SiteCollection -WorkflowHostUri https://WorkflowURL:12290-SPSite
It’s a site collection URL in any web application within the farm, it’s work as a reference to register the workflow manager with the SharePoint Farm.
If you register a workflow service to any SharePoint site collection within the farm, it will be enabled automatically for all SharePoint web applications / site collections.
-WorkflowHostUri
It’s the Workflow Host URL with port 12290 for HTTPs or 12291 for HTTP.
If you changed the default ports in the configuration phase, you will need to provide the
Check how to get Get SharePoint Workflow Manager Portsnewly ports that you have set.
-AllowOAuthHttp
This property allows connecting to the Workflow Manager over HTTP, as
Register Workflow Service Over HTTP
Register-SPWorkflowService -SPSite http://SiteCollection -WorkflowHostUri http://WorkflowURL:12291
In the nearest future, If you applied any updates, you may need to rerun the “Register-SPWorkflowService” with the “-force” property as mentioned at Re-register SharePoint Workflow Manager Service.
In this section, we’re gonna perform a health check for Workflow Manager SharePoint 2019 / 2016 to make sure that the SharePoint 2016 Workflow Manager configuration is done successfully by checking the following:
- Workflow Manager Farm status.
- Workflow Manager services status.
- Service bus services status.
- Workflow Manager Proxy status.
- Workflow Manager Site.
It’s also recommended to check Workflow Manager Health Checklist for SharePoint 2019.
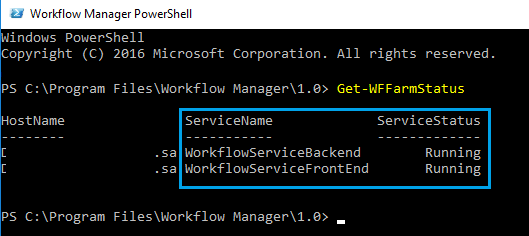
Check Workflow Manager Farm Status
- Make sure that the Workflow Manager Farm status is running.
Check Workflow Manager Services Status
- Make sure that the Workflow Manager and Service bus services are up and running.

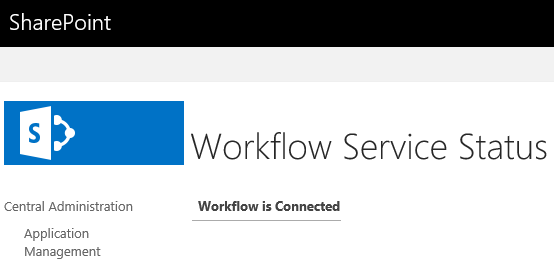
- Make sure that the SharePoint Workflow Manager Proxy is connected.
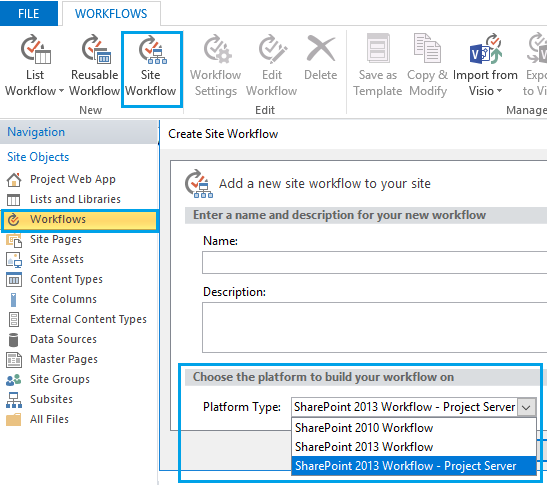
- Make sure that the SharePoint Workflow 2013 platform is listed in the SharePoint Designer.
Check Workflow Manager Site
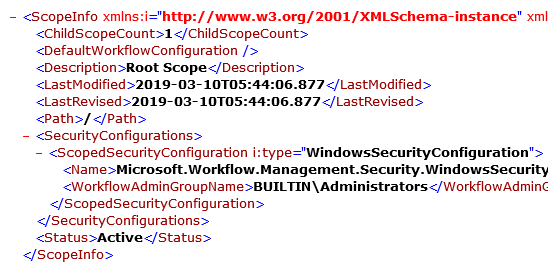
- Make sure that the Workflow Manager web service is browsed.
If the workflow manager API didn’t work , you should check Workflow Manager 403 forbidden error.
Conclusion
In conclusion, we have learned how to How to install and configure Workflow Manager SharePoint 2016 / 2019 step by step by going through the following:
- Workflow Manager Consideration for SharePoint 2016.
- Plan for Workflow Manager In SharePoint 2016.
- SharePoint Workflow Manager Prerequisites.
- Download and Install the Microsoft Web Platform Installer 5.1.
- Install SharePoint 2016 Workflow Manager / Cumulative Update.
- Configure SharePoint 2016 Workflow Manager.
- Configure Service Bus.
- Install Workflow Manager Client on all SharePoint Servers.
- Register Workflow Manager Service.
- Test Workflow Manager.
Applies To
- Workflow Manager.
- SharePoint 2016.
- SharePoint 2019.
You might also like to read
- Configure Workflow Manager for SharePoint 2013.
- SharePoint Workflow Manager Health CheckList.
- SQL Server Best Practices for SharePoint 2019.
- SharePoint 2019: Service Accounts Recommendations.
- Getting started with SharePoint Server workflow
Have a Question?
If you have any related questions, please don’t hesitate to ask it at deBUG.to Community.

Pingback: Workflow Manager: Port is blocked | SPGeeks
Simply want to say your article is as astounding. The clearness for your put up is just nice and i can suppose you’re an expert in this subject. Well together with your permission allow me to grasp your feed to stay updated with coming near near post. Thank you one million and please keep up the rewarding work.
In Poker there are particular fingers of cards which might be nicely worth more than other people. Men like genres related to action, believe about shooting, journey, sports activities and racing.
Gambling these days has been fairly glamorized and attracts on a participant’s finances. When a beginner attempts to increase his limitations, he will be easily eaten up by the expert players.
It is easy to say that if you have not tried to play the game. Poker games are video games which involve a great deal of money. But then, it may sometimes be a cause of negative things among buddies.