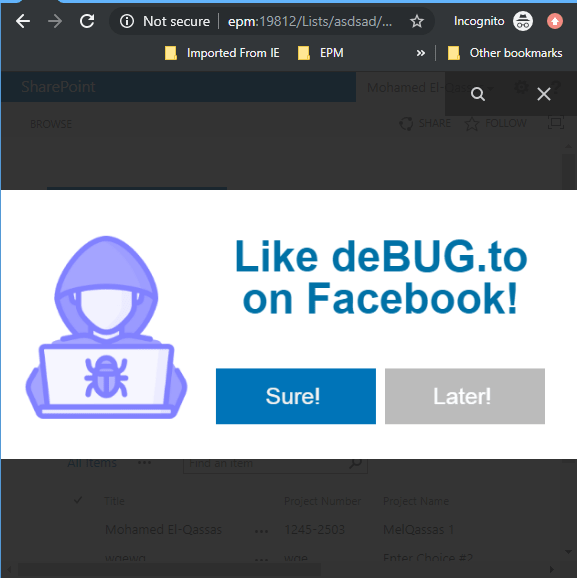
In this post, we’ll learn how to show JQuery Modal Popup once Per Session on the SharePoint Page-load in SharePoint 2016 ad 2013.
You might also like to read Show SharePoint Modal Popup once Per Session.
- 1 Show Popup dialog when open SharePoint Site
-
2
JQuery Modal Popup Once Per Session in SharePoint 2016
- 2.1 Get the Current Master Page
- 2.2 Upload JQuery files to SharePoint Style Library
- 2.3 Backup SharePoint Master Page
- 2.4 Reference FancyBox to SharePoint Master Page
- 2.5 Check-In and Publish SharePoint Master Page
- 2.6 Set Customized Master Page to SharePoint Site
- 2.7 Test fancy box Modal Dialog in SharePoint
Sometimes, you would like to notify all users inside your organization about new announcements like new service, new policy ..etc.
Besides sending an email to each user, you may also need to show a Modal Popup window in your SharePoint intranet portal.
This is modal popup dialog should be only shown when opening the SharePoint portal for only one time per each user session.
Actually, you can use default SharePoint Modal dialog to show a link or image, but, it may not fit your requirement and you may need some customization to control the number of times to show the popup dialog per each user!
In this case, I think you will need to use JQuery Modal Popup Once Per Session code to show a customized SharePoint Modal Popup dialog in more flexibility.
In this guide, we’ll go through the following steps:
- Get the Current Master Page.
- Upload JQuery files to SharePoint Style Library.
- Backup SharePoint Master Page.
- Reference FancyBox to SharePoint Master Page.
- Check-In and Publish SharePoint Master Page.
- Set Customized Master Page to SharePoint Site.
- Test fancy box Modal Dialog in SharePoint.
The mentioned steps applied to SharePoint Publishing Site, However, it’s valid for the Team site by modifying the default Master Page using SharePoint Designer.
Get the Current Master Page
First of all, you should check which Custom Master Page that you currently used in the SharePoint site.
Steps
- Open the SharePoint site in the browser.
- Click on the right top setting gear, select “Site Setting“.
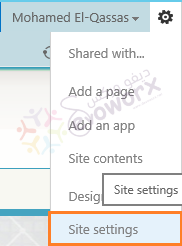
- Below “Look and Feel”, click on “Master Page“.
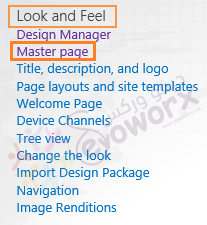
- At “Site Master Page“, Check which master page has been specified as shown below.
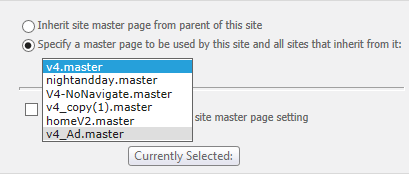
Great, we get the current Master Page specified to our SharePoint Site.
Steps
It’s preferred to download and upload the JQuery and Fancybox files to your SharePoint Site. however, you can use the CDN URLs.
- Open the SharePoint site in the browser.
- Click on the right top setting gear, select “Site Contents“.
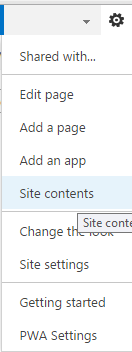
- Open “Style Library” to upload the downloaded files.
Use “File Explorer” to can easily copy and paste the download files from your local computer to the SharePoint Style Library.
If the “Open with Explorer” option is disabled as shown below,
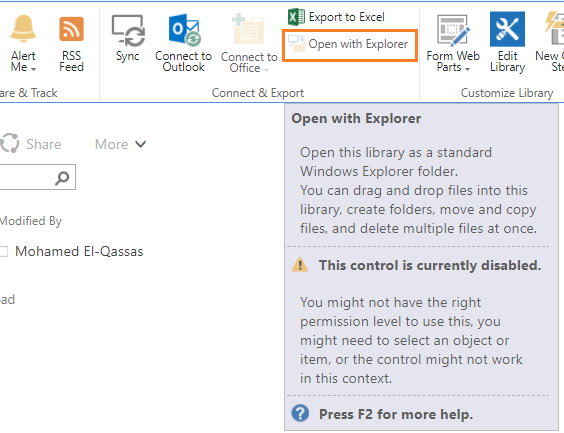
In this case, you should check We’re having a problem opening this location in File Explorer, Add this web site to your Trusted sites list and try again
Don’t forget to check-in and publish all the uploaded files as a Major version.

Steps
- Open the SharePoint Designer -> Master Page.
- Take a copy from the current master page to allow rollback.

Steps
- Rename the copied master page with an appropriate name.
- Edit Master Page in advanced mode.

- Add the below references to FancyBox, JQuery and CSS files in the Head Tag.
- jquery-1.4.3.min.js
- jquery.fancybox-1.3.4.pack.js
- jquery.fancybox-1.3.4.css
- jquery.mousewheel-3.0.4.pack.js
- jquery.cookie.js

- Pick your URL based on your location that you upload FancyBox and JQuery files.

- Again, below the added references, you should add the following code to the Head Tag.
Download the full script from GitHub at JQuery Modal Popup Once Per Session in SharePoint 2016.
function openFancybox() {
    setTimeout(function() {
        document.getElementById("modalID").click();
    }, 500);
};
$(document).ready(function() {
    var visited = $.cookie('visited');
    if (visited == 'yes') {
        // second page load, cookie active
        return false;
    } else {
        // first page load, launch fancybox
        openFancybox();
    }
    $.cookie('visited', 'yes', {
        expires: 7 // the number of days cookie will be effective });
    });
});
The above code will show the Popup dialog only one time for each user and after 7 days the cookies will expired and the popup will shown to the user again.
- Add the following code to the “body” Tag.
<a style="display:none;" id="modalID" data-fancybox href="/infopath/like.png"></a>Don’t’ forget to replace your Image or Page URL at href=
Download the full script from GitHub at JQuery Modal Popup Once Per Session in SharePoint 2016.
Steps
- Check-in your Master Page as Major Version.

- Publish your Master Page as Major Version.

Steps
- Open the SharePoint site in the browser.
- Click on the right top setting gear, select “Site Setting“.

- Below “Look and Feel”, click on “Master Page“.

- At “Site Master Page“, select the new customized Master Page.

- Check “Reset All subsites to inherit this site master page setting” if you need to apply this master page to all subsites.
- First, you should use another user account to perform this test in a correct manner.
- Login to the SharePoint Site.
- The Modal Popup Dialog will be shown on page load.

- Close and reopen the site with the same user.
- The Modal Popup Dialog will not be shown for the same user again.
- After specific days (Specified in code), the cookies will expire and the Modal dialog will show again.
Conclusion
In conclusion, we have learned how to use JQuery Modal Popup Once Per Session in SharePoint 2016 to open an announcement modal popup dialog for only one time per user session in SharePoint 2016 and 2013.
Download
You can download the full scripts that we have used in this article from GitHub at JQuery Modal Popup Once Per Session in SharePoint 2016.
Applies To
- SharePoint 2016.
- SharePoint 2013.
You might also like to read
Have a Question?
If you have any related questions, please don’t hesitate to ask it at deBUG.to Community.

Pingback: The server was unable to save the form at this time. Please try again | SPGeeks
Pingback: Open a link via Modal Dialog in SharePoint | SPGeeks
Great blog and cleaver blogger